mbeva
mbeva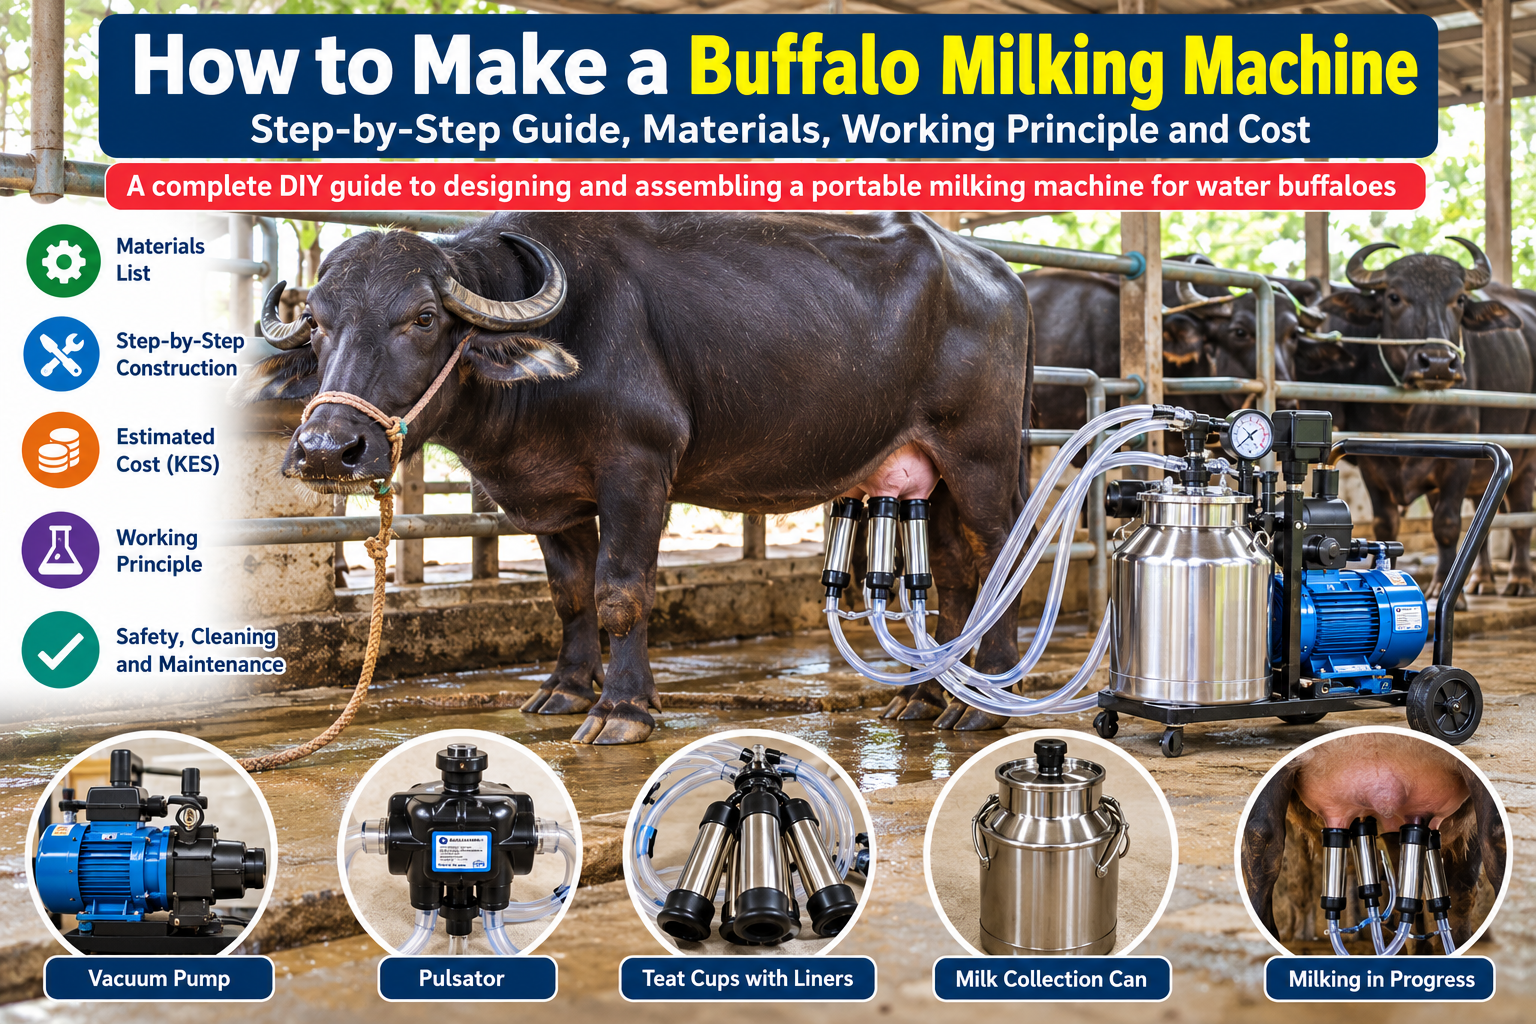
META DESCRIPTION
Learn how to make a buffalo milking machine with a materials list, working principle, assembly guide, estimated cost in Kenya, and safety tips.
Introduction
A buffalo milking machine is a mechanical device that uses controlled vacuum pressure and pulsating teat cups to extract milk from a buffalo’s udder. When properly designed, installed and maintained, it can reduce manual labour, improve milking consistency and support hygienic milk production.
For farmers and agricultural innovators, learning how to make a buffalo milking machine provides an opportunity to combine mechanical engineering, vacuum technology, animal science and dairy management.
The practical approach is to fabricate a stable frame locally and assemble it with a purpose-designed milking vacuum pump, regulator, pulsator, compatible teat cups, food-grade milk tubing and a sanitary collection vessel. The vacuum system must be professionally tested before the machine is used on an animal.
This guide explains the machine’s working principle, essential components, construction process, estimated cost in Kenya, cleaning procedures, troubleshooting and safety requirements.
Important: A buffalo milking machine must not be made by simply connecting teat cups to an ordinary vacuum pump. Incorrect vacuum pressure or pulsation can injure teats and increase the risk of mastitis. Use compatible milking equipment and obtain qualified technical verification before animal use.
1. What is a buffalo milking machine?

A buffalo milking machine is a dairy device designed to extract milk through a controlled mechanical process. It uses teat cups fitted with flexible liners to reproduce the alternating suction and massage actions involved in natural suckling.
Unlike hand milking, which requires repeated manual compression of the teats, the machine uses a vacuum system and pulsator to carry out the milking action.
The main components are:
- Vacuum pump: Produces the vacuum needed for milking.
- Vacuum regulator: Maintains the intended operating vacuum.
- Vacuum gauge: Displays the system’s vacuum level.
- Pulsator: Controls the alternating suction and massage phases.
- Teat cups and liners: Fit over the teats and provide the milking interface.
- Milk tubes and claw: Carry milk away from the teat cups.
- Collection vessel: Receives and stores the milk.
- Support frame: Holds the components securely and may include wheels for portability.
A machine designed for cattle should not automatically be assumed suitable for buffaloes. Teat-cup dimensions, liners, vacuum characteristics and pulsation must be appropriate for the animal and equipment.
2. How does a buffalo milking machine work?

The machine operates through controlled pressure differences and rhythmic liner movement.
Step 1: Vacuum generation
The vacuum pump removes air from the relevant vacuum circuit, producing pressure below atmospheric pressure.
Step 2: Controlled suction
The vacuum system applies the specified milking vacuum to the teat cups. This helps draw milk through the teat canal when the equipment is correctly fitted and operating.
Step 3: Pulsation
The pulsator alternates the pressure in the chamber surrounding each liner. The liner opens during the milking phase and compresses during the massage phase.
Step 4: Milk transport
Milk flows from the teat cups through the milk tubes into a claw or manifold and then into the collection vessel.
Step 5: Safe removal
When milking is complete, the operator releases the vacuum before removing the teat cups. The milk-contact components are then cleaned and sanitized.
3. Block diagram of the buffalo milking machine
Milking vacuum pump
Creates negative pressure
Vacuum regulator and gauge
Controls and monitors vacuum
Pulsator and teat-cup cluster
Provides alternating suction and massage
Milk tubes and claw
Transfers extracted milk
Sanitary milk collection vessel
Receives the milk
This is a functional block diagram, not a fabrication-ready plumbing schematic. The actual vacuum, pulsation and milk circuits must follow the manufacturer’s instructions for the selected equipment.
4. Materials and equipment required

The following materials are suitable for planning a portable machine using commercially designed milking components.
| Material or component | Quantity | Purpose |
|---|---|---|
| Milking vacuum pump and motor | 1 | Produces the required vacuum |
| Vacuum regulator | 1 | Controls vacuum level |
| Vacuum gauge | 1 | Monitors operating vacuum |
| Compatible pulsator | 1 | Controls pulsation |
| Teat cups with suitable liners | 4 cups | Attach to the four teats |
| Milk claw or manifold | 1 | Collects milk from the cups |
| Food-grade milk tubes | 1 set | Transfers milk |
| Pulsation tubes | 1 set | Connects the pulsator to the cup chambers |
| Stainless-steel milk collection vessel | 1 | Receives the milk |
| Protective sanitary trap or interceptor | 1 | Helps prevent milk entering the vacuum circuit |
| Metal support frame | 1 | Holds the components |
| Wheels and handle | 1 set | Allows movement |
| Clamps, seals and fittings | 1 set | Secures connections |
| Electrical protection and guards | As required | Improves operational safety |
Materials warning: Do not use ordinary plumbing hoses or unverified recycled containers for milk contact. The milk-contact components must be suitable for food use, corrosion-resistant and designed for effective cleaning.
5. Estimated cost of making a buffalo milking machine in Kenya
The following prices are illustrative planning estimates in Kenyan shillings (KES), not verified current market quotations.
| Component | Estimated cost (KES) |
|---|---|
| Milking vacuum pump and motor | 15,000–35,000 |
| Pulsator | 5,000–12,000 |
| Teat cups and liners | 6,000–12,000 |
| Stainless-steel collection vessel | 6,000–15,000 |
| Milk and pulsation tubes | 2,000–4,000 |
| Regulator and vacuum gauge | 2,000–5,000 |
| Milk claw, trap and fittings | 3,000–7,000 |
| Frame and wheels | 3,000–6,000 |
| Clamps, seals and electrical accessories | 2,000–4,000 |
| Indicative total | 44,000–100,000 |
Actual costs depend on supplier, component quality, capacity, transport, fabrication and professional installation. Some manufacturers sell the pump, regulator, pulsator and other parts together, so avoid double-counting bundled items.
How to reduce the construction cost
- Fabricate the support frame through a local metal workshop.
- Compare a complete portable bucket milker with the cost of assembling individual components.
- Select equipment with locally available replacement liners and seals.
- Consider professionally refurbished equipment only when its condition, hygiene and performance can be verified.
- Obtain a quotation that includes installation, testing and spare parts.
Do not save money by removing the vacuum regulator, pulsator, protective devices or sanitary milk-contact components.
6. Step-by-step construction and assembly

The frame and equipment supports can be fabricated locally. The functional milking circuits should be assembled according to the selected equipment’s engineering documentation.
Step 1: Design and fabricate the frame
Construct a stable frame from suitable metal, with sufficient strength to support the pump, motor and milk vessel. Provide room for servicing and cleaning.
If portability is required, fit wheels and a handle. Position the collection vessel securely so it cannot tip over during movement.
Keep the frame clean and ensure that lubricants, rust and other contaminants cannot reach milk-contact surfaces.
Step 2: Mount the vacuum pump

Secure the purpose-designed milking pump according to the manufacturer’s instructions.
Check that:
- The motor has appropriate electrical protection.
- Moving parts have suitable guards.
- The pump has adequate ventilation.
- Lubrication requirements are followed, where applicable.
- The vacuum connections are compatible with the rest of the system.
A household vacuum cleaner or general-purpose pump is not an automatic substitute for a dairy milking pump.
Step 3: Install the regulator and gauge
The vacuum regulator controls the operating vacuum, while the gauge displays the measured level.
Fit them in the locations specified by the equipment manufacturer. The gauge alone cannot protect the animal against excessive vacuum; the regulator and the complete system must function correctly.
Step 4: Connect the pulsator

Use a pulsator specifically intended for the selected milking system. Connect it using the manufacturer’s diagram and the correct pulsation tubing.
Do not construct an improvised pulsator from ordinary electrical switches or unverified valves. Pulsation rate, ratio and pressure response must be tested with appropriate equipment.
Step 5: Fit the teat cups and milk claw

Fit four compatible teat cups with suitable liners. Connect their milk tubes to the correct claw or manifold, then connect the milk outlet to the collection vessel.
Check that tubing is not kinked, crushed or damaged. Ensure the liners fit correctly and are compatible with the animal and milking unit.
Step 6: Install the milk collection vessel
Use a vessel designed for dairy collection, preferably stainless steel, with smooth and easily cleaned surfaces.
Install the specified sanitary trap or interceptor to help protect the vacuum system against milk or cleaning liquid entering it. Follow the manufacturer’s arrangement rather than improvising the vacuum and milk connections.
Step 7: Inspect all connections
Before switching on the machine, inspect the following:
- Hoses and fittings are securely attached.
- The regulator and gauge are correctly installed.
- The pulsation tubes are connected to the appropriate ports.
- Teat-cup liners are intact and properly seated.
- The collection vessel is secure and cleanable.
- Protective components are fitted.
- Electrical wiring and motor guards are safe.
Step 8: Commission the machine professionally
Before using the machine on a buffalo, arrange for a qualified milking-equipment technician to verify vacuum stability, pump performance, pulsation rate, pulsation ratio, air leaks and safety devices.
Do not attach an untested prototype to an animal.
7. Understanding vacuum pressure and pulsation

Vacuum pressure
Vacuum is a pressure below the surrounding atmospheric pressure. In a milking machine, it provides the pressure difference that helps extract milk.
The correct operating vacuum depends on the buffalo, teat-cup design, liner characteristics, milk flow and the particular equipment. Settings used for cows should not automatically be transferred to buffaloes.
Pulsation rate
Pulsation is the repeated change between the milking and massage phases. The pulsator controls how frequently this cycle occurs and the relative duration of the phases.
Both parameters affect milking performance and teat health. Have the machine tested and adjusted to the manufacturer’s specifications for the intended animal.
Never increase the vacuum merely to speed up milking. Poorly controlled vacuum and unsuitable pulsation can cause teat injury and increase the risk of udder problems.
8. Testing the buffalo milking machine

Testing should be completed before the first use and repeated as part of routine maintenance.
| Test | What to verify |
|---|---|
| Vacuum stability | The system maintains its specified operating vacuum |
| Vacuum recovery | The pump responds appropriately to air demand |
| Leak inspection | Connections do not admit unintended air |
| Pulsation test | Rate and ratio meet the equipment specifications |
| Liner inspection | Liners are intact and properly fitted |
| Milk-path inspection | Milk-contact components are secure and cleanable |
| Electrical safety | Wiring, grounding and protective devices are satisfactory |
| Trap inspection | The protective system works as intended |
A visual check is not enough to verify operating pressure and pulsation. Record the commissioning results and arrange further testing whenever performance changes.
9. How to use the machine safely

Once the equipment has been approved for use, follow a consistent milking routine.
- Position and restrain the buffalo calmly.
- Prepare the udder and teats using an appropriate dairy hygiene procedure.
- Dry the teats thoroughly with clean individual materials.
- Inspect the milk and udder for abnormalities.
- Start the machine and check that the operating conditions are within the approved specifications.
- Attach the teat cups according to the manufacturer’s instructions.
- Observe the buffalo’s comfort and milk flow.
- Stop immediately if there is pain, swelling, bleeding, abnormal milk or unusual distress.
- Release the vacuum before removing the teat cups.
- Follow the farm’s post-milking teat-care procedure.
- Transfer milk into clean storage equipment and cool it promptly according to applicable dairy requirements.
Machine milking does not replace good animal care, udder-health monitoring or hygienic milk handling.
10. Cleaning and maintenance

Milk residues can support microbial growth, so cleaning is essential after every milking session.
Cleaning procedure
- Disconnect or isolate the equipment according to the manufacturer’s instructions.
- Disassemble milk-contact components where required.
- Wash using a suitable dairy detergent and the recommended water temperature.
- Follow the specified cleaning contact time.
- Sanitize with an appropriate dairy-approved product.
- Drain and store components so they can dry hygienically.
- Inspect liners, seals, hoses and the vessel for wear.
- Replace worn components according to the manufacturer’s schedule.
Never mix cleaning chemicals unless their instructions explicitly allow it.
Maintenance schedule
| Frequency | Task |
|---|---|
| Before every milking | Inspect liners, hoses, fittings and protective devices |
| After every milking | Clean and sanitize milk-contact components |
| Weekly or as specified | Inspect tubing, filters and pulsator operation |
| At manufacturer-specified intervals | Service the pump and regulator |
| Periodically | Arrange professional vacuum and pulsation testing |
| Immediately after a fault | Stop operation and repair before reuse |
11. Common problems and troubleshooting
| Problem | Possible cause | Recommended solution |
|---|---|---|
| Weak suction | Air leaks, pump fault or regulator problem | Stop and inspect the vacuum system |
| Teat cups slipping | Incorrect liner fit or unstable vacuum | Check fit and arrange technical testing |
| Pulsator not cycling | Blockage, worn component or electrical fault | Follow the manufacturer’s troubleshooting instructions |
| Milk entering the vacuum circuit | Faulty trap or damaged components | Stop immediately and inspect the protective system |
| Contaminated milk | Poor cleaning or handling | Review sanitation and storage practices |
| Buffalo showing discomfort | Incorrect settings, poor fit or udder health problem | Stop milking and seek veterinary or technical advice |
| Pump overheating | Poor ventilation or maintenance fault | Switch off safely and inspect according to the manual |
12. Advantages and limitations
Advantages
- Reduces repetitive manual labour.
- Can improve consistency in milking.
- Supports hygienic milk handling when correctly operated.
- May help farmers manage more animals per worker.
- Offers opportunities for local fabrication of frames and supports.
- Provides a practical agricultural engineering learning project.
Limitations
- Initial investment can be substantial.
- Equipment requires cleaning and regular maintenance.
- A suitable power source is needed.
- Spare parts and technical support may be difficult to access in some areas.
- Poorly designed or operated systems can harm teat health and compromise milk quality.
The benefits depend on equipment quality, animal suitability, operator training and farm management.
13. Applications in agriculture and STEM education
A portable buffalo milking machine can be useful for dairy farms, agricultural engineering demonstrations and livestock technology research.
The project illustrates several scientific concepts:
- Physics: pressure differences and fluid flow.
- Engineering: mechanical design, stability and equipment integration.
- Biology: udder anatomy, milk ejection and animal welfare.
- Food science: milk hygiene, contamination prevention and safe storage.
- Entrepreneurship: agricultural equipment fabrication, maintenance and servicing.
For school projects, demonstrate the vacuum and pulsation principles using a suitable non-animal model. Do not attach an untested educational prototype to a live animal.
14. Frequently asked questions
Can I make a buffalo milking machine at home?
You can fabricate the frame and assemble compatible commercial components, but the complete vacuum, pulsation and milk-handling system must be properly designed and tested before animal use.
Can I use a car vacuum pump?
Not without a qualified engineering assessment. A car vacuum pump may have unsuitable capacity, duty cycle, regulation, lubrication or contamination risks for dairy milking. Use a purpose-designed milking system.
How much does a buffalo milking machine cost in Kenya?
The illustrative component budget in this guide is KES 44,000–100,000. Obtain current supplier quotations, including installation, commissioning, warranty and replacement parts.
Can the same machine milk buffaloes and cows?
Some equipment can serve both species, but suitability depends on teat-cup liners, vacuum characteristics, pulsation and the manufacturer’s specifications. Confirm compatibility before use.
Is a stainless-steel collection can necessary?
A properly designed stainless-steel vessel is generally a durable and cleanable option. Any alternative must be suitable for food contact and compatible with the equipment’s operating arrangement.
Does a milking machine increase milk production?
It can improve milking efficiency, but increased milk yield is not guaranteed. Genetics, nutrition, health, lactation stage and farm management also influence production.
Does machine milking prevent mastitis?
No. Appropriate equipment and hygienic milking practices can help manage risks, but mastitis can still occur. Udder-health monitoring and veterinary care remain important.
Is a homemade milking machine safe?
It should not be used on an animal until its vacuum, pulsation, electrical safety, milk-contact surfaces and protective systems have been professionally verified.
15. Conclusion
Making a buffalo milking machine is a practical agricultural engineering project combining vacuum technology, mechanical fabrication, animal science and dairy hygiene.
The most reliable approach is to fabricate a stable frame locally and use compatible, purpose-designed milking components. Proper commissioning, appropriate operating settings, hygienic milk handling and routine maintenance are essential for safe and effective use.
For farmers in Kenya, comparing local fabrication costs with a complete portable milking unit is a sensible first step. The best solution is not necessarily the cheapest machine, but one that can be operated safely, cleaned effectively and maintained with available technical support.
References and further reading
- Food and Agriculture Organization of the United Nations: Milking machines and equipment.
- FAO: Code of Hygienic Practice for Milk and Milk Products.
- Journal of Dairy Science: Research on working vacuum levels in buffalo milking.