mbeva
Introduction
Waste segregation is one of the biggest challenges facing modern waste management systems. Plastic bottles, paper, cardboard, and metal cans are often mixed together, making recycling more difficult and expensive.
An AI-powered waste sorting machine offers a practical way to address this problem. By combining computer vision, artificial intelligence, sensors, Arduino, and ESP32 technology, it is possible to build a system that identifies different waste materials and automatically directs them into separate collection bins.
In this tutorial, we will build EcoSort AI, a prototype that identifies four categories of waste:
- Plastic
- Paper
- Cardboard
- Metal
The project is suitable for STEM exhibitions, school innovation competitions, environmental science projects, engineering demonstrations, and advanced Arduino enthusiasts.
1. What Is EcoSort AI?
EcoSort AI is an automated waste segregation prototype that uses a camera and an artificial intelligence model to identify waste materials.
The camera captures an image of an object placed on the sorting platform. An AI model analyzes the image and predicts its category. The classification result is then sent to an Arduino controller, which activates a servo-operated sorting mechanism.
The machine directs the identified waste into the appropriate collection compartment.
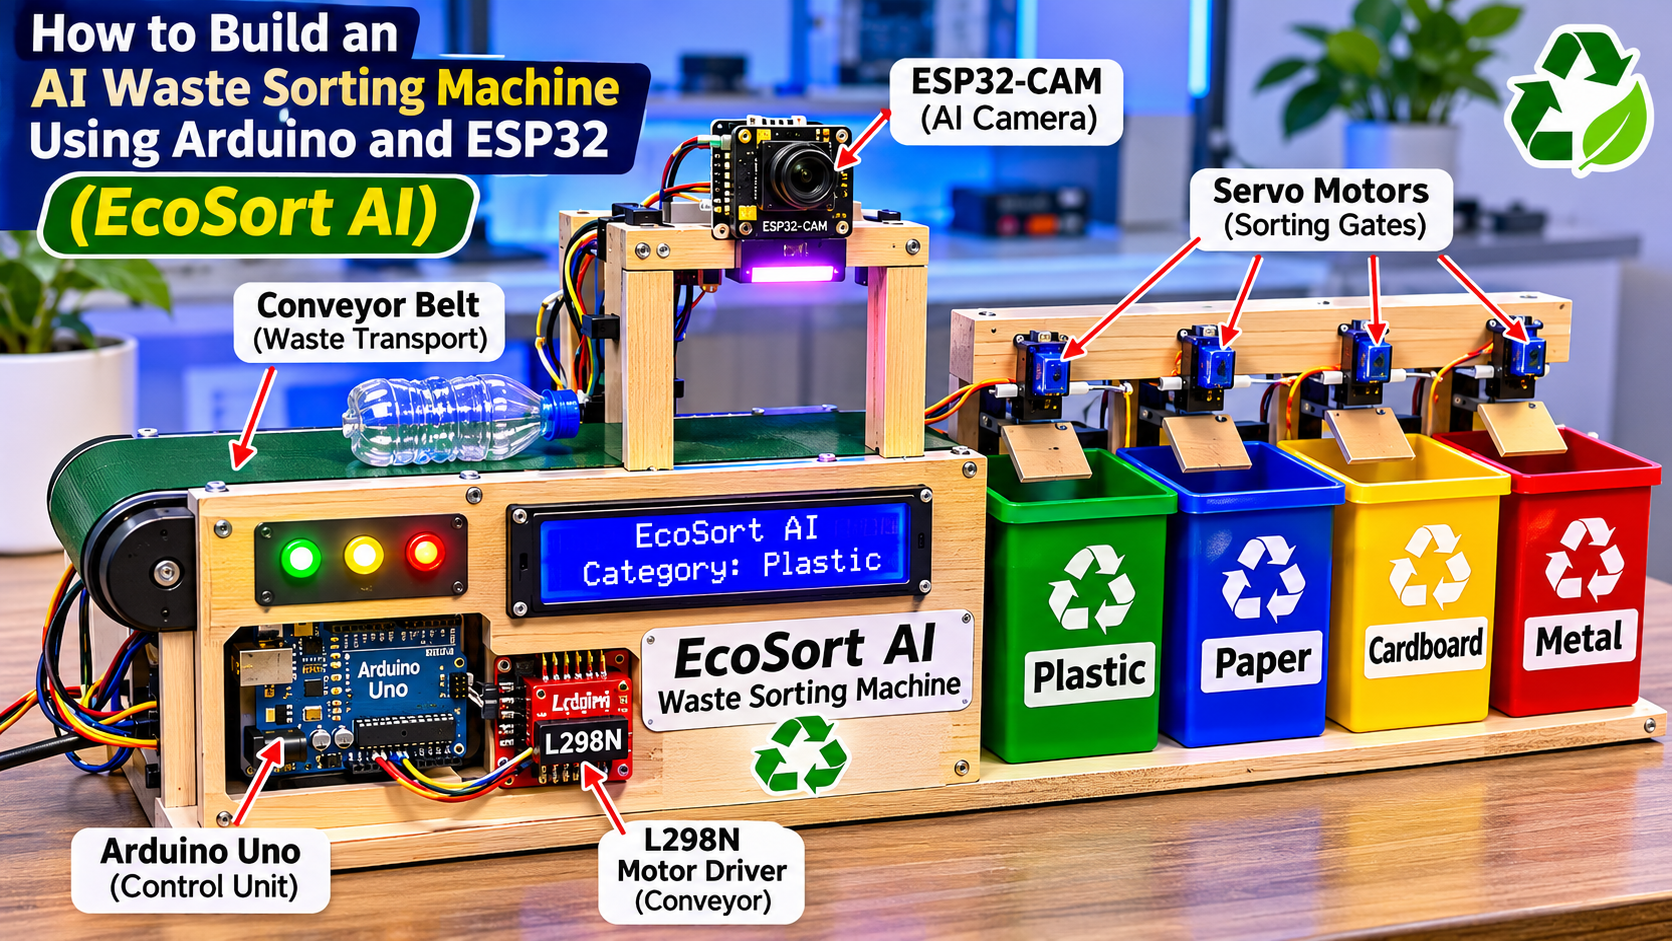
Featured project image

Image caption: EcoSort AI concept illustration showing an automated waste segregation prototype. This is a design illustration, not a photograph of a completed physical machine.
2. How Does the AI Waste Sorting Machine Work?
The system operates through five main stages.
- Waste detection: An infrared sensor detects an object placed on the sorting platform.
- Image capture: The ESP32-CAM captures an image of the waste.
- AI classification: A trained machine learning model identifies the material.
- Controller communication: The classification result is sent to the Arduino Uno.
- Automatic sorting: The Arduino activates the appropriate servo motor to direct the object into a collection bin.
For the first prototype, a laptop or compatible edge computer can run the AI classification model. The ESP32-CAM captures the image, while the Arduino handles the mechanical sorting.
This approach is practical for beginners because it separates image recognition from motor control.
Working principle diagram

Image caption: The five-stage operating principle of the AI-powered waste segregation machine.
3. Materials and Components Required
The project uses electronic components, mechanical materials, and programming tools.
Bill of Materials (BOM)
| Component | Quantity | Purpose |
|---|---|---|
| Arduino Uno R3 | 1 | Controls the sorting mechanism |
| ESP32-CAM | 1 | Captures waste images |
| ESP32 DevKit | 1 optional | Additional processing or communication |
| IR obstacle sensor | 1 | Detects waste objects |
| Servo motors | 4 | Operate the sorting gates |
| L298N motor driver | 1 | Controls conveyor motor |
| 12V geared DC motor | 1 | Drives conveyor belt |
| 16×2 I2C LCD | 1 | Displays sorting information |
| LEDs | 4 | Indicate sorting categories |
| Buzzer | 1 | Provides an alert |
| Conveyor belt materials | 1 set | Transports waste |
| Collection bins | 4 | Store sorted materials |
| Jumper wires | Several | Electrical connections |
| Regulated power supplies | As required | Power electronic components |
Components illustration

Image caption: Main electronic and mechanical components needed to construct the EcoSort AI prototype.
Additional tools
You may also need:
- Soldering iron and solder wire
- Screwdrivers
- Wire stripper
- Hot glue gun
- Measuring ruler
- Drill
- Laptop or desktop computer
- Arduino IDE
- AI model development environment
4. Estimated Project Cost in Kenya
The following is an illustrative budget for planning purposes. Actual prices will depend on the supplier, component quality, and availability.
| Component | Estimated Cost (KES) |
|---|---|
| Arduino Uno | 900 |
| ESP32 DevKit | 900 |
| ESP32-CAM | 1,200 |
| Sensors | 1,400 |
| Servo motors | 1,200 |
| Motor driver | 450 |
| LCD, LEDs and buzzer | 800 |
| Conveyor and frame | 3,500 |
| Wires and connectors | 1,100 |
| Total | 11,450 |
The estimated budget is approximately KSh 11,450, excluding some tools, optional computer equipment, and possible delivery costs.
5. System Architecture
EcoSort AI uses different electronic units to perform specific functions.
The ESP32-CAM captures images of waste materials. The AI classification program runs on a compatible computer or edge device. The computer communicates the predicted category to the Arduino Uno through a USB serial connection.
The Arduino then activates the corresponding servo motor.
System block diagram

Image caption: System architecture showing communication between the camera, AI classifier, Arduino controller, sensors, and sorting mechanism.
Main system units
1. Image acquisition unit
The ESP32-CAM captures images of waste objects. Good lighting and a consistent camera position improve image quality.
2. Artificial intelligence unit
The AI model analyzes the captured image and predicts whether the object belongs to the plastic, paper, cardboard, or metal category.
3. Control unit
The Arduino Uno receives the classification result and controls the sorting mechanism.
4. Mechanical sorting unit
Servo motors operate gates or directing flaps that guide objects into their respective bins.
5. Display unit
The LCD displays the detected waste category and sorting status.
6. Circuit Connections and Pin Configuration
Connect the electronic components according to the following pin arrangement.
Arduino Uno connections
| Component | Arduino Pin |
|---|---|
| IR sensor OUT | D2 |
| Plastic servo signal | D3 |
| Paper servo signal | D4 |
| Cardboard servo signal | D5 |
| Metal servo signal | D9 |
| L298N IN1 | D7 |
| L298N IN2 | D8 |
| L298N ENA | D6 |
| LCD SDA | A4 |
| LCD SCL | A5 |
The ESP32-CAM connects to the AI computer for image capture and classification. The AI computer sends the resulting category to the Arduino through USB serial communication.
Circuit connection diagram

Image caption: Reference connection plan for the Arduino-controlled waste sorting mechanism.
Important power supply precautions
- Do not power four servo motors directly from the Arduino Uno 5V pin.
- Use a regulated external 5–6V supply with sufficient current capacity for the servos.
- Connect the external servo supply ground to the Arduino ground.
- Power the conveyor motor using a suitable separate supply.
- Check the L298N motor driver’s current and thermal limits.
- ESP32 devices use 3.3V logic. Use suitable level shifting where an Arduino 5V output connects to an ESP32 input.
- Check the polarity of every connection before switching on the system.
Incorrect power connections can damage the microcontrollers, sensors, and motors.
7. Mechanical Construction of the Machine
The mechanical structure determines how effectively the machine transports and separates waste.
Step 1: Construct the frame
Use plywood, acrylic sheets, aluminum profiles, or other suitable materials to construct a stable frame.
The frame should accommodate:
- Camera mounting position
- Conveyor belt
- Sorting platform
- Servo-operated gates
- Four waste collection compartments
Step 2: Install the conveyor belt
Attach the conveyor belt to the frame and connect it to the geared DC motor.
Ensure that the belt moves smoothly without slipping.
Step 3: Mount the ESP32-CAM
Position the camera above the inspection point. The camera should capture clear images of objects passing through the sorting area.
Step 4: Install the servo gates
Attach the servo motors to the sorting mechanism. Each servo should control a gate or flap directing waste into a particular bin.
Step 5: Install the collection bins
Label the four collection compartments:
- PLASTIC
- PAPER
- CARDBOARD
- METAL
Construction layout image

Image caption: Suggested physical arrangement of the conveyor, camera, sorting gates, and collection compartments.
8. Artificial Intelligence Model Development
The AI model is responsible for identifying the type of waste.
A beginner-friendly approach is to use a supervised image classification model.
Step 1: Collect image datasets
Collect images of the four waste categories.
| Category | Example Training Images |
|---|---|
| Plastic | Water bottles, containers and plastic packaging |
| Paper | Newspaper, office paper and magazines |
| Cardboard | Boxes and carton packaging |
| Metal | Aluminum cans and metal containers |
Use a variety of images with different backgrounds, lighting conditions, shapes, and orientations.
Step 2: Label the images
Organize the images into four clearly named categories:
- plastic
- paper
- cardboard
- metal
Step 3: Train the classification model
Use an image classification platform or machine learning framework to train the model.
Suitable options include:
- TensorFlow
- TensorFlow Lite
- Edge Impulse
- Teachable Machine
For the initial prototype, the model can run on a laptop. The ESP32-CAM captures the image, and the laptop processes it.
Step 4: Test the model
Test the model using images that were not included in the training dataset.
Record the predictions and identify categories that are frequently confused.
Important: The AI model must be trained and tested using actual images. The Arduino code below does not perform image recognition; it controls the sorting mechanism after receiving a classification result.
9. Arduino Programming Code
The following example controls four servo motors using category labels received through USB serial communication.
Install the Servo library through the Arduino IDE before uploading the code.
#include <Servo.h>

Servo plasticServo;
Servo paperServo;
Servo cardboardServo;
Servo metalServo;

const int plasticPin = 3;
const int paperPin = 4;
const int cardboardPin = 5;
const int metalPin = 9;

const int irSensor = 2;

String receivedData = "";

void setup() {
  Serial.begin(9600);

  pinMode(irSensor, INPUT);

  plasticServo.attach(plasticPin);
  paperServo.attach(paperPin);
  cardboardServo.attach(cardboardPin);
  metalServo.attach(metalPin);

  plasticServo.write(90);
  paperServo.write(90);
  cardboardServo.write(90);
  metalServo.write(90);

  Serial.println("EcoSort AI Ready");
}

void resetGates() {
  plasticServo.write(90);
  paperServo.write(90);
  cardboardServo.write(90);
  metalServo.write(90);
}

void sortWaste(String category) {

  resetGates();
  delay(300);

  if (category == "PLASTIC") {
    plasticServo.write(30);
  }

  else if (category == "PAPER") {
    paperServo.write(30);
  }

  else if (category == "CARDBOARD") {
    cardboardServo.write(30);
  }

  else if (category == "METAL") {
    metalServo.write(30);
  }

  else {
    Serial.println("Unknown category");
    return;
  }

  Serial.print("Sorting: ");
  Serial.println(category);

  delay(1000);

  resetGates();
}

void loop() {

  if (Serial.available()) {

    receivedData = Serial.readStringUntil('\n');

    receivedData.trim();
    receivedData.toUpperCase();

    sortWaste(receivedData);
  }
}
How the code works
- The Arduino initializes the four servo motors.
- It waits for a classification label from the AI computer.
- When it receives
PLASTIC, it activates the plastic servo. - When it receives
PAPER, it activates the paper servo. - When it receives
CARDBOARD, it activates the cardboard servo. - When it receives
METAL, it activates the metal servo. - The servo returns to its default position after sorting.
The 30-degree and 90-degree positions are starting examples. Adjust them according to the mechanical arrangement of your gates.
10. Operating Flowchart
The operating sequence can be summarized as follows:
- Start the system.
- Initialize the camera, sensors, Arduino, and display.
- Detect waste at the inspection point.
- Capture an image.
- Send the image to the AI classification program.
- Identify the waste category.
- Send the category label to Arduino.
- Activate the corresponding sorting gate.
- Direct the waste into the correct bin.
- Reset the gate and wait for another object.
Operating flowchart image

Image caption: Flowchart showing the decision-making process used by the automated waste sorting machine.
11. Testing and Evaluation
After completing the construction, test the machine using different waste samples.
The evaluation should determine whether the system correctly identifies and sorts materials.
Suggested testing procedure
- Place a plastic bottle on the conveyor.
- Allow the camera to capture its image.
- Record the AI prediction.
- Observe whether the correct gate activates.
- Repeat the process using paper, cardboard, and metal.
- Record successful and unsuccessful sorting attempts.
Suggested performance indicators
| Parameter | Measurement |
|---|---|
| Classification accuracy | Percentage of correct AI predictions |
| Sorting success rate | Percentage of objects placed in correct bins |
| Response time | Time taken from detection to sorting |
| False classification | Incorrect category predictions |
| Throughput | Number of objects sorted per minute |
Classification accuracy formula
\[
\text{Accuracy} = \frac{\text{Correct Predictions}}{\text{Total Predictions}} \times 100
\]
Sorting success rate formula
\[
\text{Sorting Success Rate} =
\frac{\text{Correctly Sorted Objects}}{\text{Total Objects Tested}} \times 100
\]
Testing setup image

Image caption: Suggested testing arrangement for evaluating waste identification and automatic sorting performance.
Research note: Do not report assumed accuracy figures as experimental findings. Collect actual measurements during testing and use them in your final project report.
12. How to Fix Common Arduino and ESP32 Upload Errors
Problem 1: ESP32-CAM fails to upload code
Possible causes:
- Incorrect board selection.
- Incorrect COM port.
- Insufficient power.
- Incorrect programming connections.
Solutions:
- Select the correct ESP32 board.
- Check the USB-to-serial adapter connections.
- Ensure the programming configuration is correct.
- Use an adequate power supply.
Problem 2: Servo motors vibrate or fail to move
Possible causes:
- Insufficient current.
- Incorrect wiring.
- Poor ground connection.
Solutions:
- Use an external regulated servo supply.
- Connect the grounds together.
- Check the signal wires.
- Avoid powering multiple servos directly from the Arduino.
Problem 3: LCD displays no information
Possible causes:
- Incorrect I2C address.
- Incorrect SDA and SCL connections.
- Loose wiring.
Solutions:
- Run an I2C scanner.
- Check the LCD address.
- Confirm the connections to A4 and A5 on the Arduino Uno.
Problem 4: The machine sorts waste incorrectly
Possible causes:
- Poor training images.
- Inadequate lighting.
- Incorrect AI labels.
- Incorrect servo positions.
Solutions:
- Collect more representative training images.
- Improve camera lighting.
- Retrain the model.
- Adjust the mechanical gates.
13. Applications of EcoSort AI
The project can be developed for several practical applications.
Schools and learning institutions: Demonstrates artificial intelligence, electronics, environmental conservation, and automation.
Recycling centers: A larger version could assist with preliminary separation of recyclable materials.
Shopping centers: Smart waste collection systems could help separate selected recyclable materials.
Municipal waste management: AI-based sorting technology could support more efficient waste processing.
Research and innovation: The prototype can be extended to investigate computer vision, robotics, and smart environmental monitoring.
14. Possible Future Improvements
EcoSort AI can be upgraded to include:
- Wi-Fi monitoring using ESP32.
- Cloud-based waste collection reports.
- A mobile application for monitoring sorting statistics.
- A dashboard showing the quantity of each waste category.
- Additional classification categories such as glass and organic waste.
- A weight sensor to measure collected waste.
- Solar power for improved energy independence.
- A larger conveyor system for increased throughput.
A future version could also use an edge AI model to perform image classification without requiring a separate laptop.
15. Environmental and Educational Benefits
EcoSort AI demonstrates how technology can contribute to environmental sustainability.
The project encourages proper waste segregation, improves awareness of recycling, and introduces learners to practical applications of artificial intelligence.
It also integrates several STEM disciplines:
| STEM Area | Application |
|---|---|
| Science | Waste materials and environmental conservation |
| Technology | AI image recognition and embedded systems |
| Engineering | Conveyor, frame, and sorting mechanism |
| Mathematics | Accuracy, percentages, measurements, and data analysis |
For schools implementing Competency-Based Education (CBE), the project provides opportunities for practical learning, innovation, collaboration, problem-solving, and environmental responsibility.
16. Frequently Asked Questions
Can I build an AI waste sorting machine using Arduino?
Yes. Arduino can control the sorting mechanism, while an ESP32-CAM or another camera captures images. An AI model running on a compatible computer or edge device identifies the waste category.
What is the role of ESP32-CAM in the project?
The ESP32-CAM captures images of waste materials. These images are sent to an AI classification system for analysis.
Does Arduino Uno support AI image recognition?
The Arduino Uno has limited memory and processing capability. It is better suited to controlling motors, sensors, and sorting mechanisms. Image classification should run on a more capable computer or compatible edge device.
How many types of waste can EcoSort AI identify?
The initial design identifies four categories: plastic, paper, cardboard, and metal. More categories can be introduced by expanding the training dataset and modifying the sorting mechanism.
How much does it cost to build the project in Kenya?
The illustrative component budget in this guide is approximately KSh 11,450. The final cost depends on component prices, construction materials, and additional equipment.
Can this project be presented at a science fair?
Yes. It can be presented as an environmental science, engineering, computer science, or STEM innovation project. A strong presentation should include the working prototype, research methodology, testing data, limitations, and recommendations.
Conclusion
EcoSort AI demonstrates how artificial intelligence, Arduino, ESP32-CAM, sensors, and mechanical automation can be combined to develop a smart waste segregation system.
The prototype provides a practical introduction to machine learning, computer vision, embedded systems, and environmental engineering.
Although the initial version uses a separate computer for AI classification, future improvements could integrate edge AI processing, IoT monitoring, and more advanced sorting mechanisms.
For students, teachers, innovators, and technology enthusiasts, this project offers an opportunity to turn an environmental challenge into a practical engineering solution.