mbeva
mbeva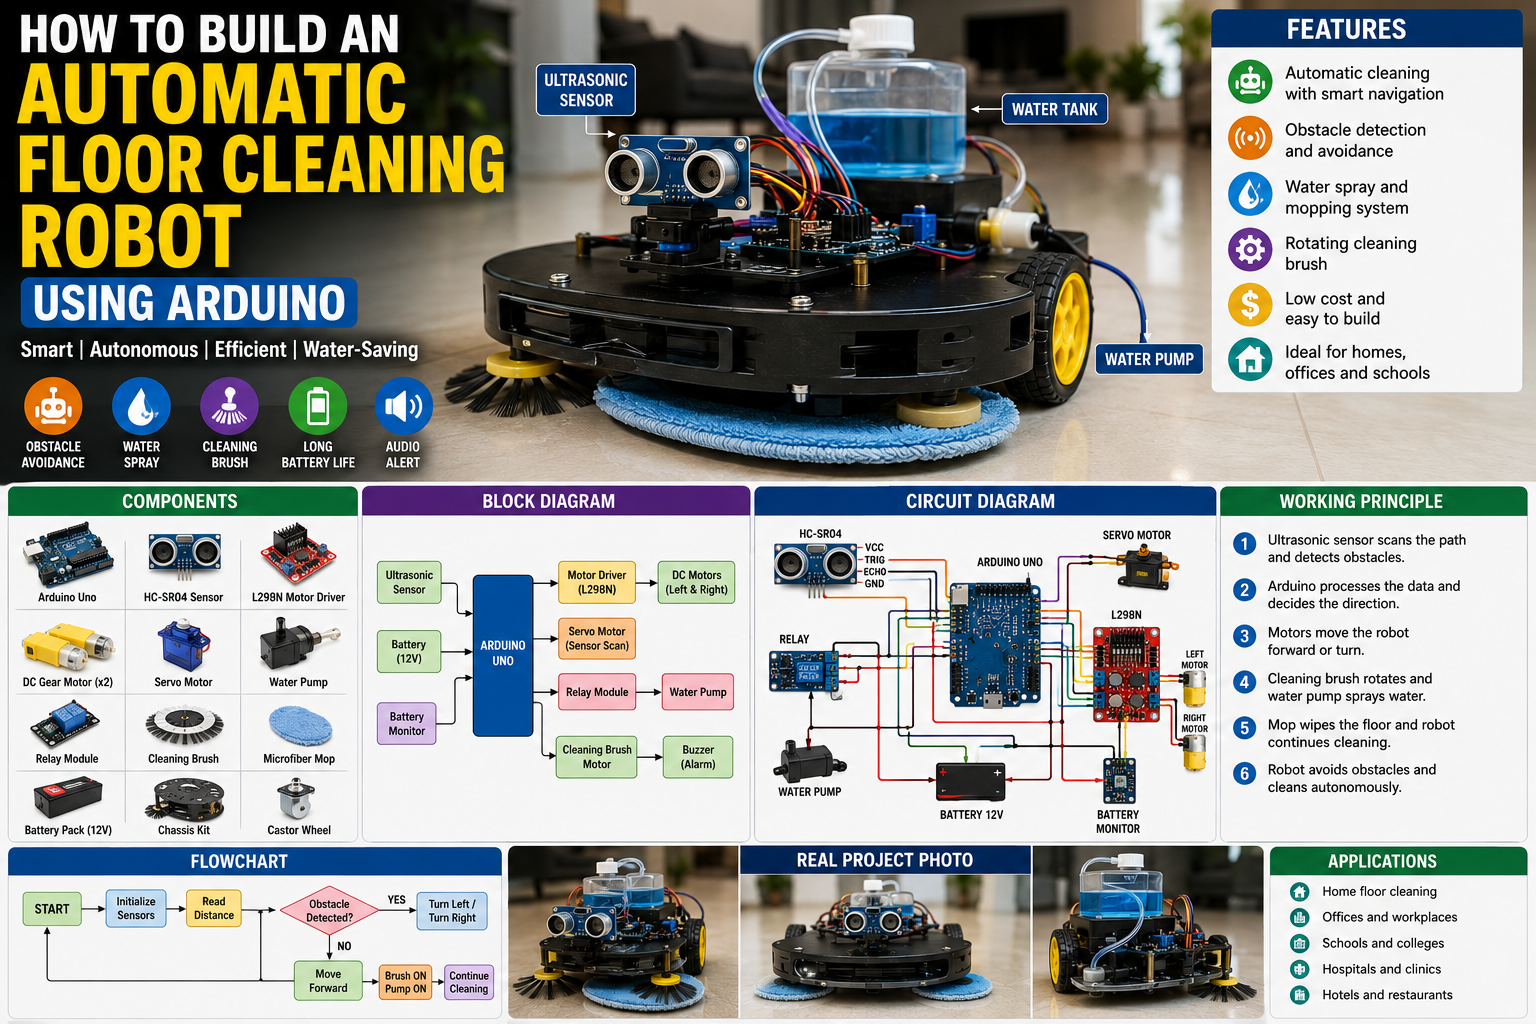
Meta Title: How to Build an Automatic Floor Cleaning Robot Using Arduino: Complete DIY Guide
Meta Description: Learn how to build an automatic floor cleaning robot using Arduino, ultrasonic sensors, motor drivers, water pump, and cleaning brushes. Includes wiring diagrams, bill of materials, circuit diagrams, flowcharts, troubleshooting tips, and complete assembly instructions.
An automatic floor cleaning robot is one of the most practical and impressive Arduino robotics projects you can build. Instead of manually sweeping and mopping floors, this intelligent robot moves autonomously, avoids obstacles, sprays water, and cleans the floor using rotating brushes or a microfiber mop.
This project combines robotics, automation, obstacle detection, motor control, and embedded programming, making it an excellent STEM project, engineering assignment, or smart home automation solution.
Quick Answer: Automatic Floor Cleaning Robot Wiring Diagram
If you want to build the robot immediately, follow the wiring configuration below.
| Component | Pin | Arduino Uno Pin |
|---|---|---|
| HC-SR04 Ultrasonic Sensor | TRIG | D9 |
| HC-SR04 Ultrasonic Sensor | ECHO | D10 |
| L298N Motor Driver | IN1 | D5 |
| L298N Motor Driver | IN2 | D6 |
| L298N Motor Driver | IN3 | D7 |
| L298N Motor Driver | IN4 | D8 |
| Relay Module | IN | D4 |
| Water Pump | Relay Output | External 12V |
| Servo Motor | Signal | D3 |
| Buzzer | Positive | D2 |
| Battery Voltage Sensor | Signal | A0 |
Important: The water pump and drive motors should be powered from an external battery pack. Never connect them directly to the Arduino’s 5V output.
System Workflow
Obstacle Detection → Arduino Processing → Motor Control → Cleaning Brush Rotation → Water Spray → Floor Cleaning → Obstacle Avoidance


5
Why Build an Automatic Floor Cleaning Robot?
Cleaning floors manually requires time and effort. Autonomous cleaning robots improve convenience by performing routine cleaning without constant human supervision.
Building your own Arduino-based cleaning robot helps you understand robotics, sensor integration, automation, and motor control while creating a practical smart home device.
Benefits
- Automatically cleans floors
- Detects and avoids obstacles
- Saves time and effort
- Improves home automation
- Affordable compared to commercial robot cleaners
- Excellent STEM and engineering project
This project demonstrates how robotics can simplify daily household tasks.
How Does the Automatic Floor Cleaning Robot Work?
The cleaning robot combines several subsystems that work together to clean efficiently.
1. Obstacle Detection
An HC-SR04 ultrasonic sensor continuously measures the distance to objects in front of the robot.
2. Navigation System
The Arduino processes sensor readings and decides whether to move forward, stop, or turn to avoid obstacles.
3. Cleaning Mechanism
A rotating cleaning brush loosens dirt while a microfiber mop wipes the surface.
A small water pump sprays water or cleaning solution ahead of the mop.
4. Motor Control
The L298N motor driver controls the two DC gear motors that move the robot.


4
Bill of Materials (BOM)
| Component | Quantity | Purpose |
|---|---|---|
| Arduino Uno or Nano | 1 | Main controller |
| HC-SR04 Ultrasonic Sensor | 1 | Obstacle detection |
| L298N Motor Driver | 1 | Controls drive motors |
| DC Gear Motors | 2 | Robot movement |
| Robot Chassis | 1 | Supports components |
| Cleaning Brush Motor | 1 | Rotates cleaning brush |
| Microfiber Mop | 1 | Wipes floor |
| Mini Water Pump | 1 | Sprays water |
| Relay Module | 1 | Controls pump |
| Servo Motor | 1 | Rotates ultrasonic sensor |
| Battery Pack (12V) | 1 | Main power supply |
| Wheels | 2 | Robot mobility |
| Castor Wheel | 1 | Front support |
| Jumper Wires | Several | Electrical connections |
| Water Tank | 1 | Holds cleaning solution |
Estimated Project Cost
| Item | Approximate Cost |
|---|---|
| Arduino Uno | $10 |
| Motor Driver | $4 |
| Ultrasonic Sensor | $3 |
| Robot Chassis Kit | $18 |
| Motors | $15 |
| Water Pump | $10 |
| Battery | $18 |
| Miscellaneous | $15 |
Estimated Total Cost: $75–95
Circuit Connections Explained
Ultrasonic Sensor
- TRIG → D9
- ECHO → D10
- VCC → 5V
- GND → GND
Motor Driver
- IN1 → D5
- IN2 → D6
- IN3 → D7
- IN4 → D8
Relay Module
- IN → D4
Servo Motor
- Signal → D3
Battery Monitor
- Analog Output → A0


6
Step-by-Step Guide: How to Build an Automatic Floor Cleaning Robot Using Arduino
Step 1: Assemble the Robot Chassis
Install the DC motors, wheels, and castor wheel.
Ensure the chassis is balanced before mounting electronic components.
Step 2: Install the Cleaning System
Attach the rotating brush beneath the chassis.
Install the microfiber mop behind the brush.
Mount the water tank securely above the pump.
Step 3: Install the Ultrasonic Sensor
Mount the HC-SR04 sensor at the front of the robot.
For improved navigation, mount it on a servo motor to scan left and right.
Step 4: Connect the Electronics
Wire all components according to the wiring table.
Verify polarity and motor connections before powering the system.
Step 5: Upload the Arduino Program
The Arduino software should perform the following tasks:
- Measure obstacle distance.
- Drive the motors.
- Activate the cleaning brush.
- Turn the water pump ON.
- Avoid obstacles automatically.
Example program logic:
Start

↓

Initialize Sensors

↓

Measure Distance

↓

Obstacle?

↓

YES → Turn Left or Right

↓

NO → Move Forward

↓

Brush ON

↓

Pump ON

↓

Repeat
Step 6: Test the Robot
Place the robot on a smooth floor.
Verify that:
- It moves forward smoothly.
- It detects obstacles.
- It changes direction automatically.
- The cleaning brush rotates.
- The pump sprays water.
- The mop cleans the floor effectively.


5
Arduino Program Logic
The Arduino continuously executes the following sequence:
- Read ultrasonic sensor values.
- Detect nearby obstacles.
- Decide movement direction.
- Control DC motors.
- Rotate cleaning brush.
- Activate water pump.
- Continue cleaning until stopped.
This feedback loop enables fully autonomous floor cleaning.
Applications
This cleaning robot can be used in:
- Homes
- Offices
- Schools
- Hospitals
- Hotels
- Shopping malls
- Laboratories
- Smart buildings
Advantages and Limitations
Advantages
- Fully automatic cleaning
- Obstacle avoidance
- Water-saving operation
- Affordable DIY project
- Expandable with Wi-Fi and AI
Limitations
- Limited battery life
- Small water tank capacity
- Basic navigation compared to commercial robots
- Requires regular brush maintenance
Safety Tips
- Keep electrical components away from water leaks.
- Disconnect power before maintenance.
- Avoid cleaning highly uneven surfaces.
- Secure all wiring before testing.
- Use only low-voltage DC power supplies.
Frequently Asked Questions
Can I Add Wi-Fi Monitoring?
Yes. Replace the Arduino Uno with an ESP32 for Wi-Fi connectivity and remote control using platforms like Blynk or MQTT.
Can the Robot Vacuum Dust?
Yes. You can add a miniature vacuum fan and dust collection chamber.
Can It Return to a Charging Station?
Yes. By adding infrared beacons or charging contacts, you can develop an automatic docking system.
Can It Map Rooms?
Yes. Integrating LiDAR or vision sensors enables simultaneous localization and mapping (SLAM).
How to Fix Common Arduino Upload Errors
Error: “avrdude: stk500_recv(): programmer is not responding”
Solutions
- Select the correct COM port.
- Disconnect modules connected to RX/TX.
- Replace the USB cable.
- Restart the Arduino IDE.
Error: Robot Does Not Move
Solutions
- Check battery voltage.
- Verify motor driver wiring.
- Test each motor individually.
Error: Ultrasonic Sensor Reads Incorrect Distances
Solutions
- Mount the sensor securely.
- Remove objects blocking the sensor.
- Check TRIG and ECHO connections.
Error: Water Pump Does Not Start
Solutions
- Test the relay separately.
- Verify the external power supply.
- Check pump polarity.
Error: Robot Continuously Hits Obstacles
Solutions
- Increase obstacle detection distance.
- Improve servo scanning angle.
- Adjust turning delay values.


5
Final Thoughts
Learning how to build an automatic floor cleaning robot using Arduino is an excellent way to explore robotics, automation, and smart home technology.
By combining ultrasonic obstacle detection, motor control, water spraying, and autonomous navigation, you can build a practical robot capable of cleaning indoor floors with minimal human intervention.
As your skills advance, you can enhance the robot with ESP32-based Wi-Fi control, camera vision, AI object recognition, LiDAR navigation, automatic charging, and mobile app integration, creating a next-generation intelligent cleaning robot suitable for advanced research and real-world applications