Meta Description: Learn how to build a fire fighting robot using Arduino, flame sensors, a motor driver, and a water pump. Includes wiring diagrams, bill of materials, installation steps, code overview, and troubleshooting tips.
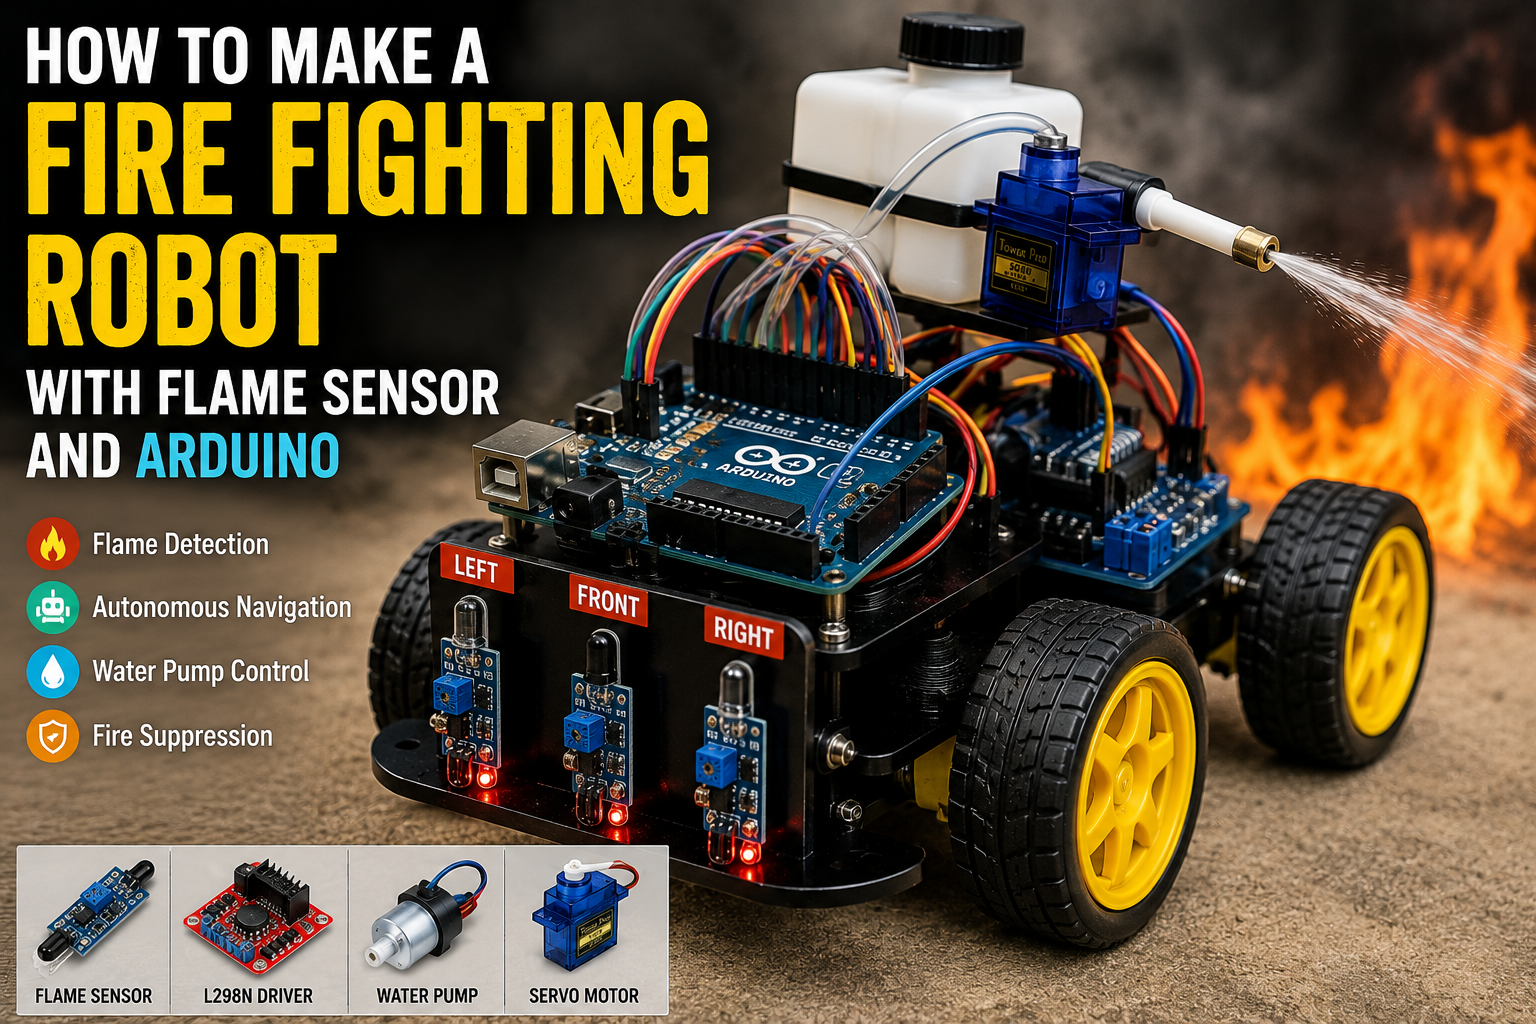
A fire fighting robot is an exciting Arduino project that combines robotics, automation, and safety technology. Using flame sensors, an Arduino microcontroller, and a mini water pump, this robot can detect small flames, move toward the source, and spray water automatically.
This project is ideal for STEM education, robotics competitions, and science fairs because it demonstrates real-world applications of autonomous systems.
Quick Answer: Fire Fighting Robot Wiring Diagram
If you want to start building immediately, use the following connection map.
| Component | Pin | Arduino Uno Pin |
|---|---|---|
| Flame Sensor (Left) | OUT | D2 |
| Flame Sensor (Center) | OUT | D3 |
| Flame Sensor (Right) | OUT | D4 |
| L298N Motor Driver | IN1 | D5 |
| L298N Motor Driver | IN2 | D6 |
| L298N Motor Driver | IN3 | D7 |
| L298N Motor Driver | IN4 | D8 |
| Relay Module | IN | D9 |
| SG90 Servo Motor | Signal | D10 |
| Water Pump | Relay Output | External Battery |
Important: This project is designed for educational demonstrations using small, controlled flames such as candles. Never use a DIY robot to fight real fires or enter dangerous environments.
System Workflow:
Flame Detection → Arduino Processing → Motor Navigation → Water Pump Activation → Fire Suppression


Why Build a Fire Fighting Robot?
Autonomous fire fighting robots help reduce human exposure to dangerous situations by detecting and suppressing fires remotely.
Building your own Arduino-based fire fighting robot offers several benefits:
- Learn robotics fundamentals
- Understand sensor integration
- Explore autonomous navigation
- Gain experience with motor control
- Develop programming skills
- Build an impressive STEM project
This project introduces core concepts used in industrial safety systems and emergency response technologies.
How Does a Fire Fighting Robot Work?
The robot combines three essential systems:
Flame Detection System
Flame sensors detect infrared light emitted by fire.
Navigation System
The Arduino analyzes sensor data and controls the motors through the L298N driver.
Fire Suppression System
When the robot reaches the flame, it activates a mini water pump to extinguish it.
The robot continuously scans its surroundings, identifies the direction of the flame, moves toward it, and sprays water automatically.


Bill of Materials (BOM)
| Component | Quantity | Purpose |
|---|---|---|
| Arduino Uno or Nano | 1 | Main controller |
| Flame Sensors | 3 | Detect flame location |
| L298N Motor Driver | 1 | Controls DC motors |
| DC Gear Motors | 2 | Drive the robot wheels |
| Robot Chassis | 1 | Supports components |
| Mini Water Pump | 1 | Sprays water |
| Relay Module | 1 | Switches the pump on and off |
| SG90 Servo Motor | 1 | Directs the water nozzle |
| Battery Pack (7.4V–12V) | 1 | Powers the system |
| Jumper Wires | 20+ | Electrical connections |
| Water Reservoir | 1 | Stores water |
| Wheels and Castor Wheel | 1 Set | Robot movement |
Estimated Project Cost
| Item | Approximate Cost (USD) |
|---|---|
| Arduino Uno | $8–15 |
| Flame Sensors | $3–8 |
| L298N Driver | $3–5 |
| Robot Chassis and Motors | $10–20 |
| Pump and Relay | $5–10 |
Total Estimated Cost: $35–60
Circuit Connections Explained
Flame Sensor Connections
- Left Flame Sensor → D2
- Center Flame Sensor → D3
- Right Flame Sensor → D4
Motor Driver Connections
- IN1 → D5
- IN2 → D6
- IN3 → D7
- IN4 → D8
Water Pump Connections
- Relay IN → D9
- Pump Power → External Battery
Servo Motor Connection
- Signal → D10
Tip: Use separate power supplies for the motors and water pump to avoid voltage drops that may reset the Arduino.


Step-by-Step Guide: How to Make a Fire Fighting Robot with Flame Sensor and Arduino
Step 1: Assemble the Robot Chassis
Install the DC motors and wheels onto the chassis.
Ensure all components are securely mounted.
Step 2: Position the Flame Sensors
Place the three flame sensors at the front of the robot:
- Left sensor detects flames on the left.
- Center sensor detects flames ahead.
- Right sensor detects flames on the right.
Step 3: Install the Water Pump System
Connect the mini water pump to a small water reservoir.
Attach the nozzle to the servo motor to direct the water stream.
Step 4: Connect the Electronics
Wire all components according to the connection table.
Double-check polarity and common grounds before powering the system.
Step 5: Upload the Arduino Code
The program should:
- Continuously monitor flame sensors.
- Determine the flame direction.
- Drive the robot toward the fire.
- Stop at a safe distance.
- Activate the water pump.
Example logic:
If center sensor detects flame:
    Move forward

If left sensor detects flame:
    Turn left

If right sensor detects flame:
    Turn right

If flame is close:
    Stop and activate pump
Step 6: Test the Robot
Place a candle on a fireproof surface and observe the robot’s behavior.
Verify that:
- The robot detects the flame correctly.
- The motors move smoothly.
- The servo aims accurately.
- The water pump activates automatically.
Always keep a real fire extinguisher nearby during testing.


Arduino Fire Fighting Robot Code Logic
The Arduino continuously reads data from all flame sensors.
When a sensor detects a flame:
- The Arduino identifies the direction.
- The motor driver adjusts the robot’s movement.
- The robot approaches the flame.
- The relay activates the water pump.
- The servo directs the nozzle until the flame disappears.
This process creates an autonomous fire suppression system for educational purposes.
Applications of Fire Fighting Robots
Fire fighting robots are used in:
- Industrial facilities
- Warehouses
- Chemical plants
- Underground mines
- Search and rescue operations
- Hazardous environments
Learning this project provides a foundation for advanced robotics and automation systems.
Advantages and Limitations
Advantages
- Reduces human exposure to hazards
- Demonstrates autonomous decision-making
- Affordable and customizable
- Excellent STEM learning project
Limitations
- Limited water capacity
- Short flame detection range
- Ineffective against large fires
- Requires regular battery maintenance
Safety and Legal Considerations
This robot is intended solely for educational demonstrations.
Always follow these precautions:
- Test only with small flames.
- Keep adults present during demonstrations.
- Never leave the robot unattended.
- Keep flammable materials away from the test area.
- Have a certified fire extinguisher available.
How to Fix Common Arduino Upload Errors
Error: “avrdude: stk500_recv(): programmer is not responding”
Solutions:
- Verify the correct COM port.
- Disconnect modules connected to RX and TX pins.
- Replace the USB cable.
- Select the correct board type.
Error: “Board Not Detected”
Solutions:
- Install USB drivers.
- Try another USB port.
- Restart the Arduino IDE.
Error: “Compilation Error: No Such File or Directory”
Solutions:
Install required libraries such as:
- Servo.h
Restart the Arduino IDE after installation.
Error: Robot Moves Erratically
Solutions:
- Check battery voltage.
- Verify motor driver wiring.
- Ensure all grounds are connected.
Error: Flame Sensors Trigger False Alarms
Solutions:
- Adjust sensor sensitivity.
- Reduce ambient light interference.
- Shield sensors from direct sunlight.


Final Thoughts
Learning how to make a fire fighting robot with flame sensor and Arduino is an excellent introduction to robotics, sensor technology, and automation.
By combining flame detection, motor control, and automated water delivery, you can create a functional prototype that demonstrates how intelligent machines can assist in hazardous environments.
Start with a simple design, test thoroughly, and expand your project with advanced features such as wireless monitoring, obstacle avoidance, and remote control capabilities.