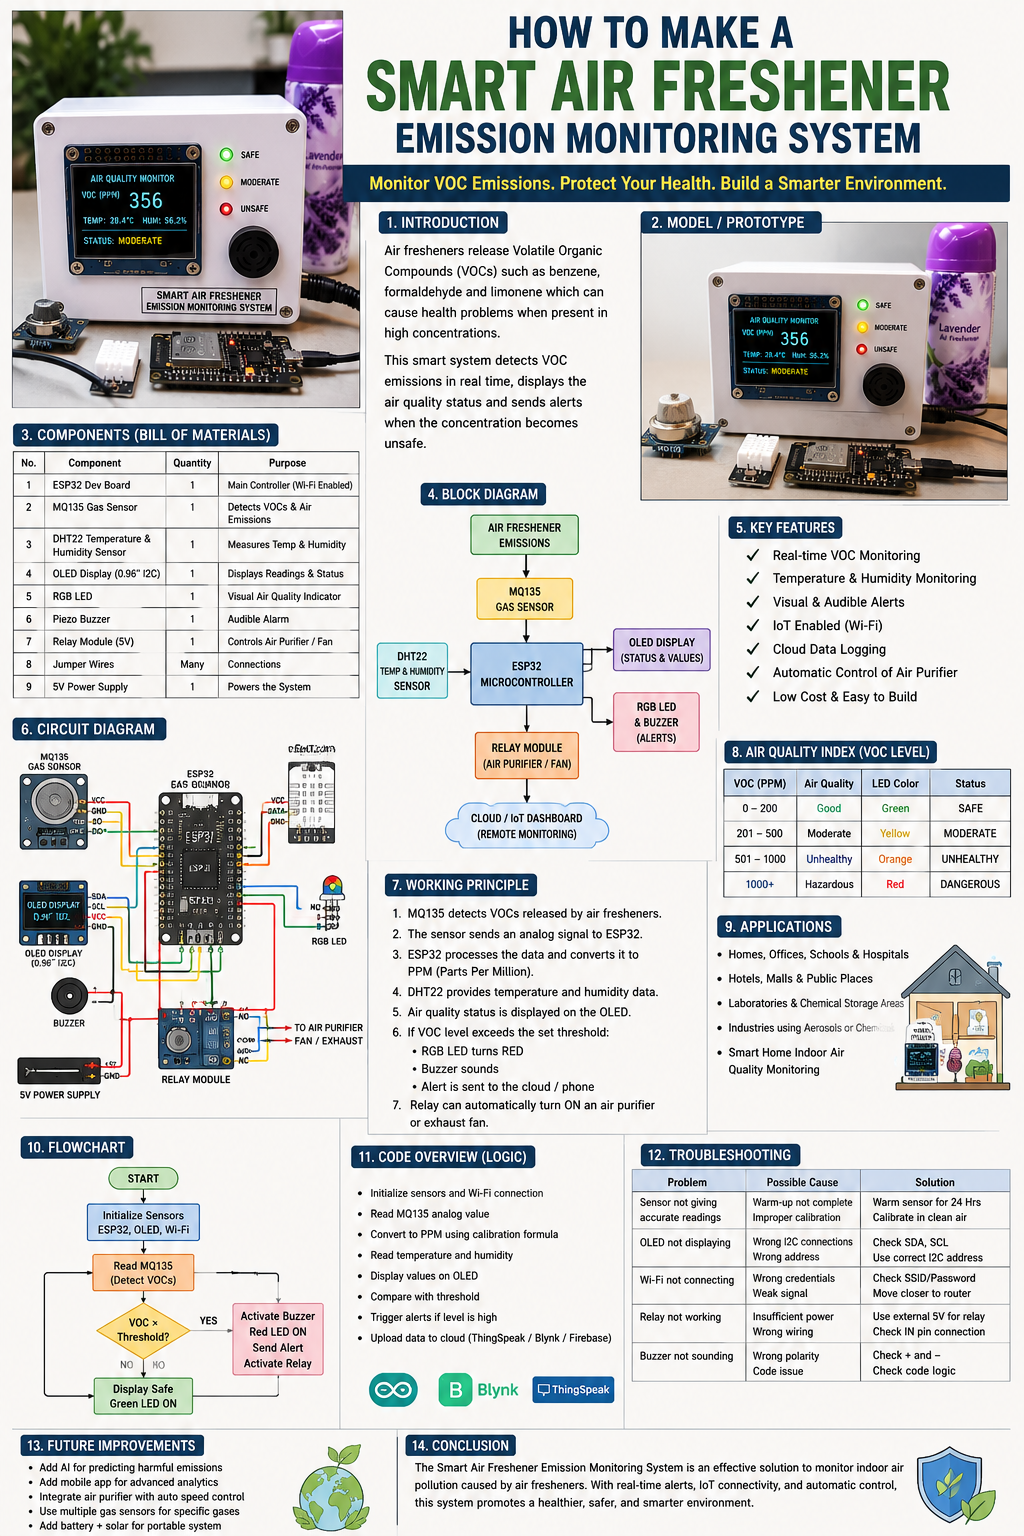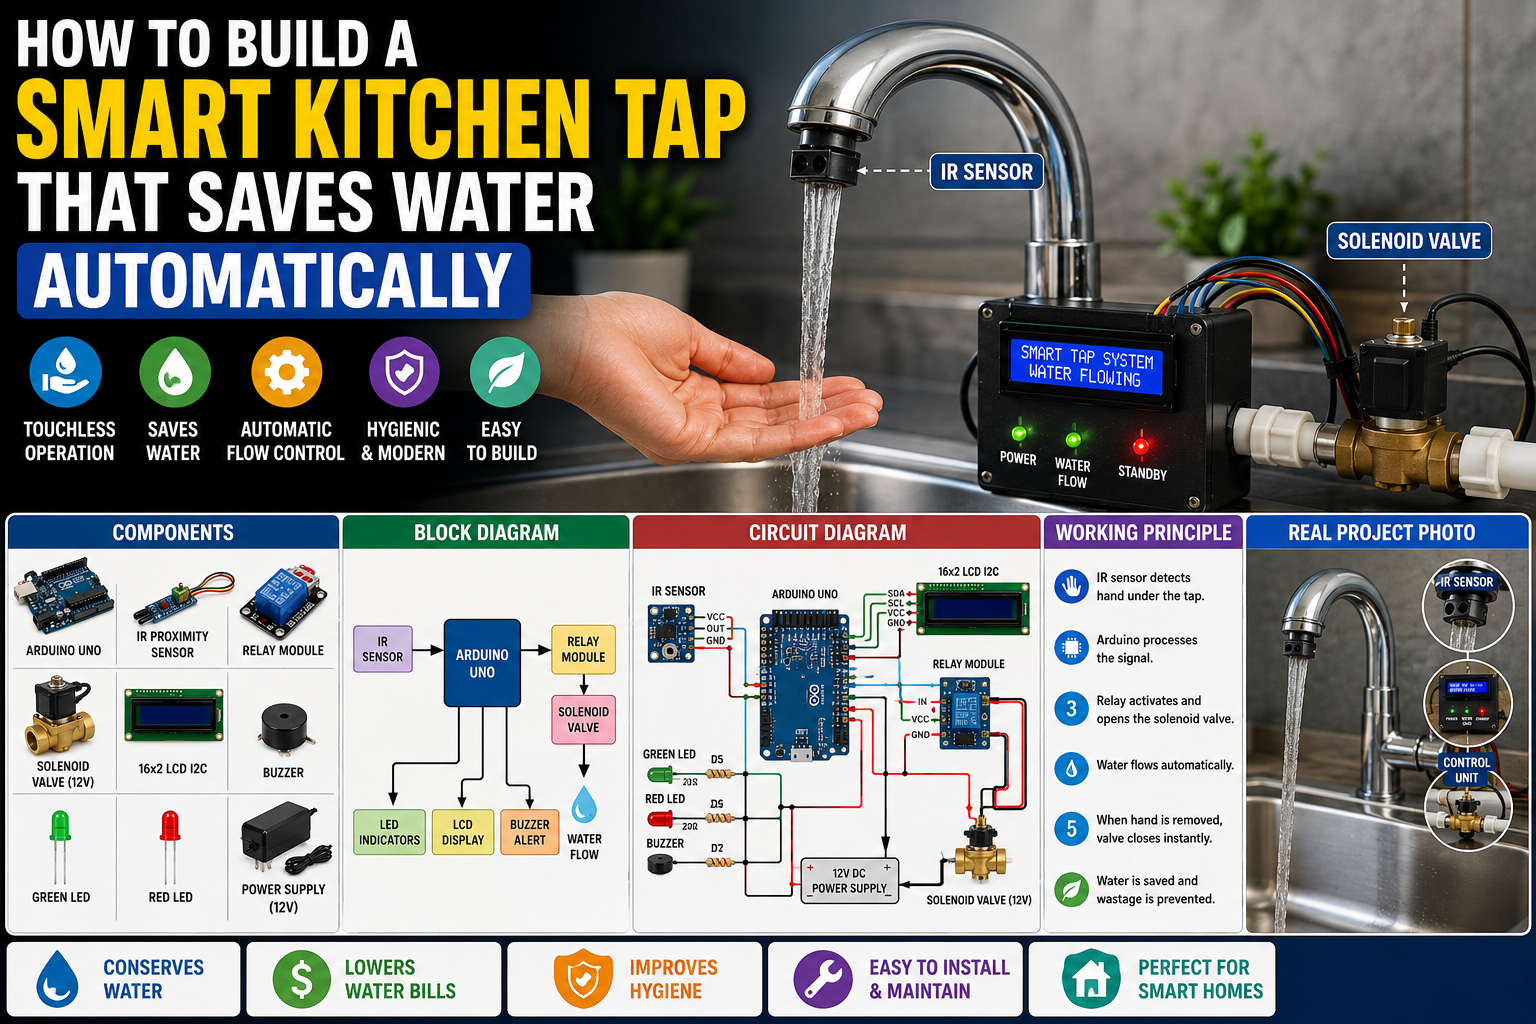
How to Build a Smart Kitchen Tap That Saves Water Automatically Using Arduino
Meta Description: Learn how to build a smart kitchen tap using Arduino, an infrared sensor, solenoid valve, and relay module. Includes wiring diagrams, bill of materials, circuit diagrams, installation guide, troubleshooting tips, and code overview.
A smart kitchen tap is one of the most practical home automation projects you can build with Arduino. Instead of manually opening and closing the faucet, the tap automatically dispenses water whenever your hands are detected and shuts off immediately when they are removed.
This simple automation helps reduce water wastage, improves hygiene, and modernizes your kitchen using inexpensive electronic components.
Quick Answer: Smart Kitchen Tap Wiring Diagram
If you want to build the project immediately, use the following wiring configuration.
| Component | Pin | Arduino Uno Pin |
|---|---|---|
| IR Proximity Sensor | OUT | D2 |
| Relay Module | IN | D8 |
| Relay Module | VCC | 5V |
| Relay Module | GND | GND |
| Solenoid Valve | Relay Output | External 12V Supply |
| Green LED | Positive | D5 |
| Red LED | Positive | D6 |
| Piezo Buzzer | Positive | D7 |
| 16×2 LCD I2C (Optional) | SDA | A4 |
| 16×2 LCD I2C (Optional) | SCL | A5 |
Important: Never power the solenoid valve directly from the Arduino. Use a relay module or MOSFET driver with a suitable external power supply.
System Workflow
Hand Detection → IR Sensor → Arduino → Relay Module → Solenoid Valve Opens → Water Flows → Hand Removed → Valve Closes


Why Build a Smart Kitchen Tap?
Traditional kitchen taps waste significant amounts of water because users often leave them running while washing dishes or hands.
A smart kitchen tap solves this problem by automatically controlling water flow based on hand detection.
Benefits
- Saves water
- Improves hygiene
- Reduces water bills
- Prevents unnecessary water wastage
- Easy to install
- Ideal for smart homes
This project is perfect for STEM learning, home automation, and environmental conservation.
How Does a Smart Kitchen Tap Work?
The system consists of four main sections.
1. Hand Detection
An infrared proximity sensor continuously scans for objects beneath the faucet.
2. Arduino Processing
The Arduino monitors the sensor output and determines whether a hand is present.
3. Water Flow Control
If a hand is detected, the Arduino energizes the relay, opening the solenoid valve.
When the hand is removed, the relay switches OFF, stopping water flow.
4. User Feedback
LED indicators, a buzzer, or an LCD display can provide system status information.


Bill of Materials (BOM)
| Component | Quantity | Purpose |
|---|---|---|
| Arduino Uno or Nano | 1 | Main controller |
| IR Proximity Sensor | 1 | Detects hands |
| Solenoid Water Valve (12V DC) | 1 | Controls water flow |
| Single Channel Relay Module | 1 | Switches valve ON/OFF |
| Green LED | 1 | Water flowing indicator |
| Red LED | 1 | System standby indicator |
| Piezo Buzzer | 1 | Audio feedback |
| 16×2 LCD I2C (Optional) | 1 | Displays status |
| Breadboard | 1 | Circuit assembly |
| Jumper Wires | Several | Connections |
| 12V DC Adapter | 1 | Powers valve |
| 5V Adapter | 1 | Powers Arduino |
Estimated Project Cost
| Item | Approximate Cost |
|---|---|
| Arduino Uno | $10 |
| IR Sensor | $3 |
| Relay Module | $3 |
| Solenoid Valve | $10 |
| LCD Display | $6 |
| Miscellaneous | $10 |
Estimated Total Cost: $40–50
Circuit Connections Explained
IR Sensor
- VCC → 5V
- GND → GND
- OUT → D2
Relay Module
- IN → D8
- VCC → 5V
- GND → GND
Solenoid Valve
Connect the valve to the relay’s Normally Open (NO) terminal and power it using a 12V adapter.
Indicators
Green LED → D5
Red LED → D6
Buzzer → D7
LCD SDA → A4
LCD SCL → A5


Step-by-Step Guide: How to Build a Smart Kitchen Tap That Saves Water Automatically
Step 1: Install the IR Sensor
Mount the infrared sensor beneath the kitchen faucet so it faces the area where hands will be placed.
Ensure it has a clear detection path.
Step 2: Assemble the Arduino Circuit
Wire the IR sensor, relay module, LEDs, buzzer, and optional LCD according to the connection table.
Verify all connections before powering the circuit.
Step 3: Install the Solenoid Valve
Turn off the household water supply.
Install the normally closed solenoid valve in the water line leading to the faucet.
Reconnect the plumbing and check for leaks before powering the electronics.
Step 4: Upload the Arduino Program
The Arduino program should:
- Continuously monitor the IR sensor.
- Detect hand presence.
- Energize the relay.
- Open the solenoid valve.
- Close the valve when the hand is removed.
- Update LEDs and LCD.
Example logic:
If Hand Detected

Open Solenoid Valve

Green LED ON

Else

Close Solenoid Valve

Red LED ON
Step 5: Test the System
Place your hands beneath the faucet.
Verify that:
- The IR sensor detects your hands.
- Water flows immediately.
- Water stops within one second after your hands are removed.
- LEDs display the correct status.
- The buzzer activates if enabled.


Arduino Program Logic
The Arduino continuously repeats the following process:
- Read the infrared sensor.
- Detect hand presence.
- Compare sensor value with threshold.
- Activate the relay.
- Open the solenoid valve.
- Monitor for hand removal.
- Close the valve.
- Update the display and indicators.
This feedback loop ensures water is dispensed only when needed.
Applications
This smart kitchen tap is suitable for:
- Homes
- Restaurants
- Hospitals
- Schools
- Hotels
- Public washrooms
- Food processing facilities
- Smart home automation systems
Advantages and Limitations
Advantages
- Conserves water
- Improves hygiene
- Reduces water bills
- Easy to build
- Low maintenance
- Expandable with IoT features
Limitations
- IR sensors may be affected by strong sunlight.
- Requires electrical power.
- Solenoid valves produce a clicking sound when switching.
- Sensor sensitivity may require adjustment.
Safety Tips
- Disconnect electrical power before plumbing work.
- Use waterproof enclosures for electronics.
- Keep Arduino components away from water.
- Ensure all wiring connections are insulated.
- Test the valve at low pressure before full operation.
Frequently Asked Questions
Can I Use an Ultrasonic Sensor Instead of an IR Sensor?
Yes. An ultrasonic sensor offers longer detection distances and is less affected by reflective surfaces.
Can I Monitor Water Usage?
Yes. Add a water flow sensor to measure total water consumption.
Can I Control the Tap Using Wi-Fi?
Yes. Replace the Arduino Uno with an ESP32 and integrate platforms such as Blynk or MQTT for remote monitoring.
How to Fix Common Arduino Upload Errors
Error: “avrdude: stk500_recv(): programmer is not responding”
Solutions
- Verify the correct COM port.
- Disconnect external modules during upload.
- Replace the USB cable.
- Restart the Arduino IDE.
Error: Relay Does Not Activate
Solutions
- Check the relay wiring.
- Confirm the relay module receives 5V.
- Verify the control pin in the code.
Error: Solenoid Valve Does Not Open
Solutions
- Check the external 12V power supply.
- Verify valve polarity.
- Test the relay independently.
Error: IR Sensor Detects Continuously
Solutions
- Adjust the sensitivity potentiometer.
- Reduce ambient light interference.
- Reposition the sensor.
Error: LCD Displays Nothing
Solutions
- Verify SDA and SCL connections.
- Adjust the LCD contrast.
- Scan the I2C address using an Arduino I2C scanner.


Final Thoughts
Learning how to build a smart kitchen tap that saves water automatically is one of the most useful Arduino home automation projects. By combining an infrared sensor, relay module, and solenoid valve, you can create a touchless faucet that conserves water, improves hygiene, and enhances everyday convenience.
Once your basic system is working, you can extend it with Wi-Fi connectivity, voice assistant integration, water flow monitoring, mobile notifications, and cloud-based analytics to create a fully featured smart water management solution.