mbeva
Why Solar Panels Are Important for School Projects
Solar energy is one of the most practical renewable energy technologies for teaching electricity generation, energy conversion, environmental conservation, and engineering design.
For schools implementing Competency-Based Education (CBE), solar energy provides opportunities for learners to move beyond theoretical lessons and develop working prototypes that address everyday challenges.
A solar panel converts sunlight into electrical energy through photovoltaic cells. The electricity can be used immediately, stored in a battery, or converted into a suitable form for powering electrical appliances.
Why Should Schools Invest in Solar Energy Demonstrations?
Solar projects help learners:
- Understand renewable and non-renewable energy sources.
- Investigate electricity generation and energy transformation.
- Develop practical engineering and problem-solving skills.
- Explore environmental conservation.
- Apply mathematics through electrical measurements and calculations.
- Develop innovations for KSEF and STEM competitions.
Examples of School Solar Projects
| Project | Solar application |
|---|---|
| Solar-powered irrigation | Powers a small water pump |
| Automatic classroom lighting | Provides lighting when required |
| Solar charging station | Charges compatible electronic devices |
| Smart greenhouse | Powers monitoring equipment |
| Solar security system | Powers outdoor sensors and lights |
| Solar energy monitor | Measures voltage, current and power |
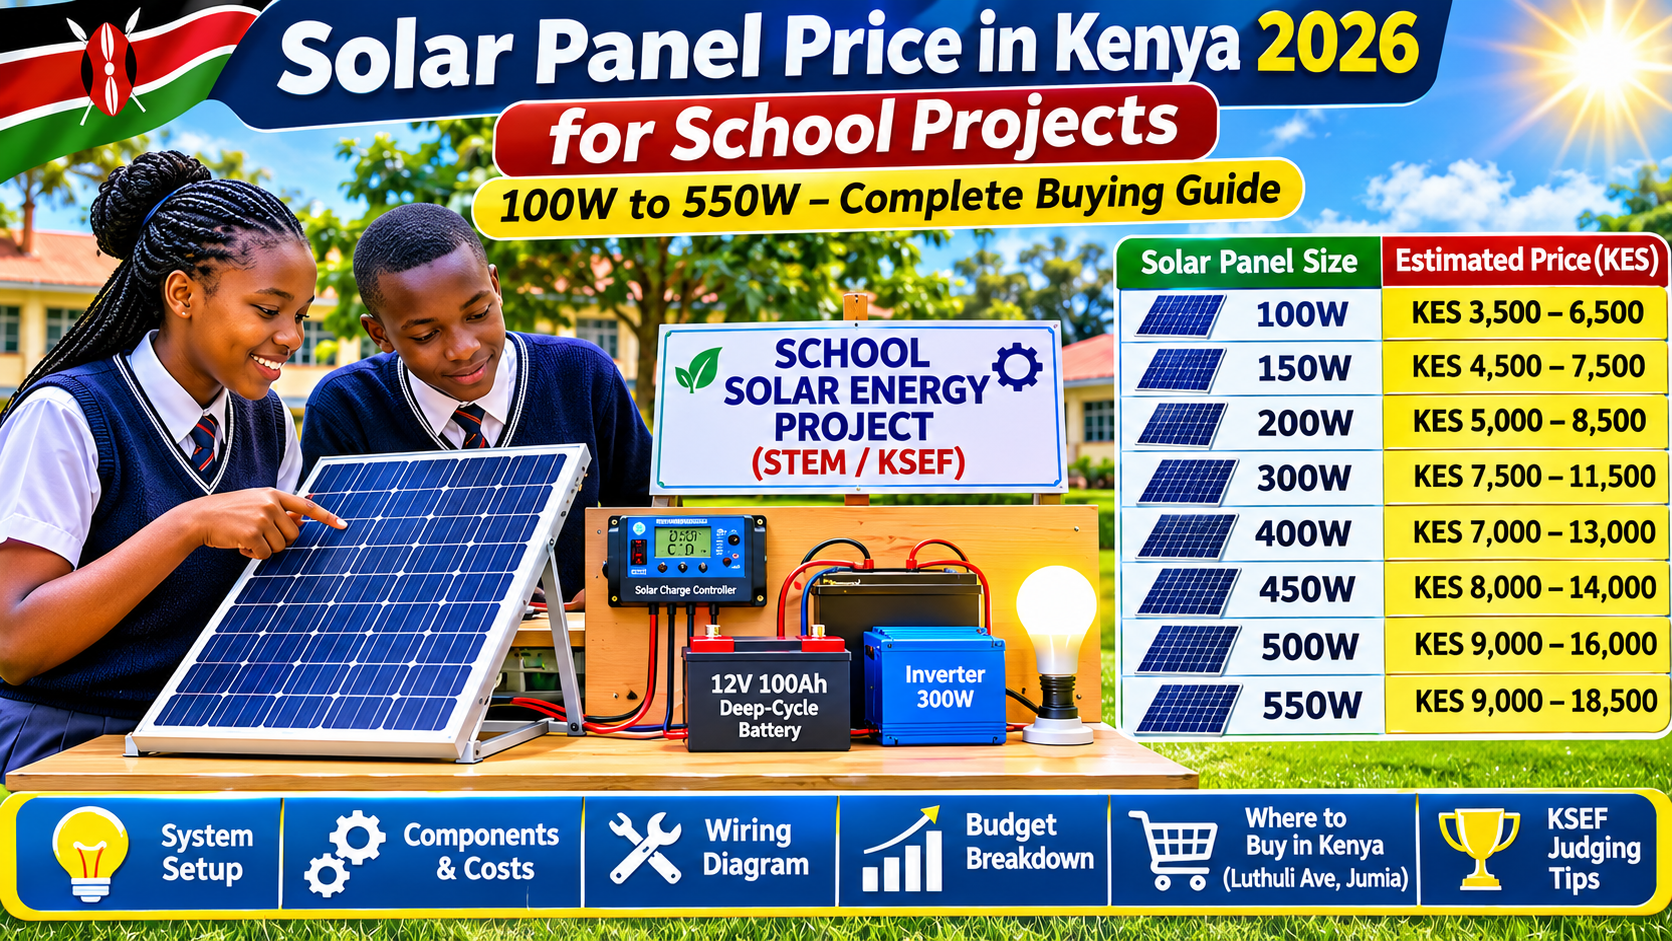
3. Solar Panel Price List in Kenya 2026: 100W to 550W
The price of a solar panel depends on its rated capacity, cell technology, manufacturer, physical condition, warranty, and supplier.
The following prices are indicative budgeting estimates for Kenyan buyers. They are not live quotations or guaranteed prices.

Figure 1: Different solar panel capacities available for small and large renewable energy projects.
Solar Panel Price Comparison Table
| Panel capacity | Estimated price (KES) | Recommended application |
|---|---|---|
| 100W | 3,500–6,500 | Basic demonstrations |
| 150W | 4,500–7,500 | Small lighting systems |
| 200W | 5,000–8,500 | School STEM projects |
| 250W | 6,000–10,000 | Charging demonstrations |
| 300W | 7,500–11,500 | Irrigation prototypes |
| 400W | 7,000–13,000 | Larger school projects |
| 450W | 8,000–14,000 | Water pumping demonstrations |
| 500W | 9,000–16,000 | Advanced renewable energy projects |
| 550W | 9,000–18,500+ | Large demonstration systems |
Important: The ranges are approximate planning figures. A higher-capacity panel may cost less per watt than a smaller panel. Compare actual specifications and warranty terms rather than relying on wattage alone.
3.1 Understanding 100W Solar Panels
A 100W solar panel is a suitable entry-level option for schools and learners working with limited budgets.
It can be used to demonstrate:
- Solar electricity generation.
- Battery charging.
- DC lighting.
- Small electronic projects.
For example, learners can construct a demonstration system using a 100W panel, a compatible charge controller, a suitable battery and a 12V LED bulb.
3.2 Understanding 200W Solar Panels
A 200W solar panel offers greater flexibility for classroom demonstrations.
It can support:
- Solar-powered lighting.
- Small battery charging systems.
- Renewable energy experiments.
- Small agricultural monitoring prototypes.
For many school demonstrations, 200W is a useful starting capacity because it allows learners to investigate several electrical concepts without necessarily constructing a large installation.
3.3 Understanding 300W Solar Panels
A 300W solar panel is suitable for more advanced STEM projects.
Possible applications include solar-powered water pumping, smart agriculture, battery storage demonstrations and small solar energy laboratories.
However, the battery, charge controller and cables must be selected according to the panel’s electrical characteristics.
3.4 Understanding 400W–550W Solar Panels
Larger panels are useful when the project requires higher energy production.
They are suitable for:
- Advanced agricultural innovations.
- Larger solar charging systems.
- Demonstration of renewable energy storage.
- Multiple low-power electrical loads.
A 550W panel should not automatically be connected to a 12V system. Its operating voltage and current must be compatible with the controller and battery architecture.
4. How to Choose the Right Solar Panel for a School Project
Choosing a solar panel based only on price can lead to an unsuitable project design.
Before purchasing, consider the following factors.
4.1 Rated Power Output
The wattage indicates the panel’s rated maximum power under standard test conditions.
A 200W panel has a nominal maximum output of 200 watts under those conditions, but its actual output varies with sunlight, temperature, orientation and shading.
4.2 Monocrystalline vs. Polycrystalline Solar Panels

Monocrystalline
Typically higher efficiency per unit of area.

Polycrystalline
Traditional multi-crystal cell appearance; compare price and efficiency.
| Feature | Monocrystalline | Polycrystalline |
|---|---|---|
| Cell appearance | Usually dark | Usually blue and mottled |
| Efficiency | Generally higher | Generally lower |
| Space requirement | Less for similar output | More for similar output |
| School application | Excellent | Suitable |
| Buying decision | Compare value and warranty | Compare value and warranty |
4.3 Solar Panel Voltage and Current
Two important electrical specifications are:
- Voc: Open-circuit voltage.
- Isc: Short-circuit current.
Other important specifications include:
- Vmp: Voltage at maximum power.
- Imp: Current at maximum power.
- Maximum system voltage.
- Maximum series fuse rating.
These specifications help determine whether the panel can safely operate with a selected charge controller.
A panel’s rated power is approximately:
P_{\text{max}}=V_{\text{mp}}\times I_{\text{mp}}
For example, a panel with an operating voltage of 20V and current of 10A has a rated power of approximately:
P=20\times10=200W
5. Complete School Solar Demonstration System
A functional solar energy demonstration needs several components working together.

Figure 2: Complete solar demonstration system showing electricity generation, regulation, storage and utilization.
5.1 Main System Components
| Component | Function |
|---|---|
| Solar panel | Generates DC electricity |
| Charge controller | Regulates battery charging |
| Battery | Stores electrical energy |
| Inverter | Converts DC to AC when needed |
| DC LED bulb | Demonstrates electrical load |
| Cables | Carry electrical current |
| Fuses | Protect against excessive current |
| Multimeter | Measures electrical quantities |
5.2 Working Principle
The solar energy system operates through five main processes.
- Energy collection: Photovoltaic cells absorb sunlight and generate electrical energy.
- Energy regulation: The charge controller regulates the charging process.
- Energy storage: The battery stores electrical energy.
- Energy conversion: An inverter converts DC electricity to AC where required.
- Energy utilization: The stored or generated electricity powers a suitable load.
For school demonstrations, a DC lighting circuit is often simpler, less expensive and safer than including an inverter.
6. Bill of Materials and Complete Budget Breakdown
The following is an illustrative budget for a 200W solar demonstration project.
6.1 Bill of Materials (BOM)
| No. | Component | Specification | Quantity | Estimated cost (KES) |
|---|---|---|---|---|
| 1 | Solar panel | 200W | 1 | 7,000 |
| 2 | Charge controller | 20A, suitable MPPT/PWM model | 1 | 2,500 |
| 3 | Battery | 12V, 100Ah deep-cycle | 1 | 14,000 |
| 4 | DC LED bulbs | 12V, 5W | 2 | 600 |
| 5 | DC fuses and holders | Correctly rated | 2 | 500 |
| 6 | Solar cables | Suitable cross-section | 1 set | 1,000 |
| 7 | MC4 connectors | Compatible pair | 1 | 300 |
| 8 | Mounting frame | Metal or treated wood | 1 | 2,000 |
| 9 | Digital multimeter | DC voltage/current measurement | 1 | 1,500 |
| Estimated total | 29,400 |
These are illustrative budget allowances, not verified supplier prices. Installation labor, transportation, controller accessories and additional protection may increase the final cost.
6.2 Budget by Project Size
| Project type | Panel size | Estimated total budget |
|---|---|---|
| Basic DC demonstration | 100W | KES 12,000–22,000 |
| Classroom solar model | 200W | KES 25,000–35,000 |
| Advanced solar prototype | 300W | KES 35,000–60,000 |
| Larger demonstration | 500W–550W | KES 55,000–100,000+ |
These are planning allowances for different system configurations, not direct quotations. Battery capacity, inverter inclusion and load requirements strongly influence the final cost.
7. Solar Panel Wiring Diagram and Connection Guide
The wiring arrangement depends on the panel’s voltage, controller type, battery chemistry and electrical load.
For a small 12V school demonstration, the following is a simplified DC connection arrangement.

Figure 3: Solar panel to charge controller, battery and DC lighting wiring arrangement.
7.1 Pin-to-Pin Connection Table
| From | Terminal | Connect to |
|---|---|---|
| Solar panel positive | PV+ | Controller PV+ |
| Solar panel negative | PV− | Controller PV− |
| Battery positive | BAT+ | Controller BAT+ |
| Battery negative | BAT− | Controller BAT− |
| LED positive | LOAD+ | Controller LOAD+ |
| LED negative | LOAD− | Controller LOAD− |
Important technical considerations:
- Connect the battery first, following the controller manufacturer’s instructions.
- Verify panel Voc and Isc against the controller’s maximum input ratings.
- Install suitable battery-side and load-side protection.
- Check the controller’s load-terminal current rating.
- Do not connect a 12V LED directly to a panel whose output voltage exceeds the LED’s rating.
- A 200W panel may exceed the input capability of some 20A controllers, depending on panel voltage and controller design.
For this reason, use a controller specifically rated for the selected panel and battery configuration.
8. Step-by-Step Construction of a School Solar Project

Figure 4: Solar energy prototype construction in a school STEM laboratory.
Step 1: Prepare the Materials
Collect the solar panel, controller, battery, cables, fuses, DC bulbs, mounting materials and measuring equipment.
Check the specifications before assembly.
Step 2: Construct the Panel Stand
Build a stable frame that holds the solar panel securely.
The frame should:
- Support the panel’s weight.
- Resist wind.
- Allow suitable orientation toward the sun.
- Prevent unnecessary shading.
Step 3: Install the Charge Controller
Mount the controller in a dry, ventilated and accessible position.
Avoid placing it where rainwater, direct excessive heat or accidental contact could damage it.
Step 4: Install the Battery
Position the battery in an appropriate enclosure.
Observe the battery manufacturer’s ventilation, handling and charging requirements.
Step 5: Connect the System
Following the controller manual, connect the battery, panel and DC load using correctly rated cables and protective devices.
Check polarity before energizing the system.
Step 6: Test the Prototype
Expose the panel to sunlight and observe the controller’s charging indication.
Measure the relevant electrical quantities and confirm that the DC load operates correctly.
Step 7: Label the Model
Clearly identify:
- Solar panel.
- Charge controller.
- Battery.
- Positive and negative terminals.
- DC output.
- Electrical load.
A neatly labeled demonstration makes the working principle easier to explain.
9. Experimental Investigation: Solar Power Output vs. Time of Day
This is one of the most useful scientific activities learners can perform with their solar project.
Research question: How does the time of day affect the electrical power generated by a solar panel?
Objectives
- Measure solar panel voltage at different times.
- Measure current under a consistent load.
- Calculate electrical power.
- Compare output throughout the day.
- Identify environmental factors affecting solar performance.
Experimental Materials
| Material | Purpose |
|---|---|
| Solar panel | Electricity generation |
| Digital multimeter | Electrical measurement |
| Suitable DC load | Provides a consistent test load |
| Connecting cables | Electrical connections |
| Clock | Records measurement time |
| Notebook | Data recording |
Experimental Procedure
- Position the panel in an open location.
- Ensure the panel receives sunlight without unnecessary shading.
- Connect the selected load.
- Measure voltage across the load.
- Measure current using a correctly configured meter in series.
- Repeat measurements hourly.
- Calculate power for every observation.
- Plot a graph of power against time.
The electrical power equation is:
P=V\times I
Where:
- P = Power (W)
- V = Voltage (V)
- I = Current (A)
Blank Experimental Data Table
| Time | Voltage (V) | Current (A) | Power (W) |
|---|---|---|---|
| 8:00 AM | |||
| 9:00 AM | |||
| 10:00 AM | |||
| 11:00 AM | |||
| 12:00 PM | |||
| 1:00 PM | |||
| 2:00 PM | |||
| 3:00 PM | |||
| 4:00 PM | |||
| 5:00 PM |

Figure 5: Blank graph template for recording solar panel power output from 8:00 AM to 5:00 PM.
Expected scientific interpretation: Solar output often increases as solar irradiance increases, but the highest output is not guaranteed to occur at exactly noon. Cloud cover, panel orientation, temperature, shading and electrical loading can affect the results.
10. Smart Solar Monitoring Using Arduino or ESP32
A basic solar energy project can be upgraded into a smart monitoring system using a microcontroller.

Figure 6: Conceptual smart solar energy monitoring system using a microcontroller and electrical sensors.
Suggested Components
| Component | Quantity | Function |
|---|---|---|
| ESP32 development board | 1 | Processes measurements |
| Voltage sensor | 1 | Measures panel voltage |
| Current sensor | 1 | Measures panel current |
| LCD display | 1 | Displays readings |
| Temperature sensor | 1 | Measures panel temperature |
| Solar panel | 1 | Generates electricity |
| DC regulator | 1 | Supplies suitable microcontroller voltage |
Possible System Features
- Real-time voltage monitoring.
- Current measurement.
- Power calculations.
- Battery voltage monitoring.
- Temperature monitoring.
- Wi-Fi data transmission.
- Historical performance graphs.
For an advanced school project, learners could develop a dashboard showing solar performance and battery condition.
Technical note: The sensor modules must support the actual voltage and current range. An ESP32 GPIO pin must never be exposed directly to a solar panel’s output voltage. Use suitable sensing interfaces, protection and regulated power supplies.
11. How to Fix Common Solar System Installation Errors
Although solar panels do not require software uploads, school solar projects can experience electrical and performance problems.
| Problem | Possible cause | Recommended solution |
|---|---|---|
| Battery not charging | Incorrect wiring | Check PV and battery connections |
| Low power output | Shading or dirt | Clean panel and remove shading |
| Controller switches off | Overload or low battery | Check load and battery condition |
| LED does not light | Incorrect polarity | Check DC connections |
| Battery drains quickly | Excessive load | Reduce consumption |
| Controller becomes hot | Poor ventilation or overload | Check ratings and installation |
| Inverter alarm | Low voltage or overload | Check battery and inverter capacity |
Troubleshooting Checklist
Before replacing components:
- Inspect cables for damage.
- Check all electrical connections.
- Measure battery voltage.
- Check the controller’s error indicators.
- Confirm that the panel is receiving sunlight.
- Verify that the load is within the system’s capacity.
12. Where to Buy Solar Panels in Kenya in 2026
Kenyan schools, teachers and parents can compare solar panels through physical retailers and online marketplaces.
12.1 Luthuli Avenue, Nairobi

Figure 7: Luthuli Avenue, Nairobi, an electronics shopping destination where buyers can compare solar equipment.
Luthuli Avenue is a popular destination for electronics and electrical equipment in Nairobi.
Buyers can compare:
- Solar panels.
- Deep-cycle batteries.
- Charge controllers.
- Inverters.
- Solar cables.
- Electrical accessories.
When visiting shops, request quotations from different sellers and confirm the actual specifications of the equipment.
12.2 Jumia Kenya

Jumia Kenya
Visit Jumia KenyaCompare online solar products, sellers and delivery options.
Jumia Kenya provides an alternative for buyers who prefer online shopping.
Search for:
- 100W solar panels.
- 200W monocrystalline panels.
- 300W solar panels.
- 500W and 550W solar panels.
- Solar batteries.
- Charge controllers.
Check customer reviews, seller ratings, product descriptions, return conditions and warranty information.
12.3 Specialist Solar Equipment Suppliers
Other suppliers worth comparing include:
- Davis & Shirtliff.
- Chloride Exide.
- PowerPoint Systems.
Compare complete system quotations instead of selecting a supplier solely because its panel price is lower.
13. Pro Tip for KSEF Judging: Demonstrate Real Innovation

Figure 8: Using a digital multimeter to demonstrate solar panel voltage and current during a science exhibition.
For KSEF participants, the strongest project presentations combine a working prototype, scientific investigation and a clear explanation of the innovation.
Five Strategies to Improve Your KSEF Presentation
1. Present a functional prototype
Show that the system works rather than relying entirely on diagrams and theoretical explanations.
2. Collect experimental evidence
Record actual voltage, current and power measurements.
3. Explain the scientific principle
Explain photovoltaic electricity generation and the role of each component.
4. Demonstrate originality
Show how the project improves an existing technology or solves a practical problem.
5. Explain cost and community benefits
Show how the innovation could help schools, farmers or households.
KSEF innovation idea
Develop an intelligent solar-powered irrigation system that automatically activates a water pump when soil moisture falls below a selected threshold. Combine solar energy, moisture sensing and automated control to address water management challenges in agriculture.
14. Safety Precautions and Technical Limitations
Solar energy is generally suitable for educational demonstrations, but electrical safety must be prioritized.
Electrical Safety
- Always observe positive and negative polarity.
- Use appropriately rated fuses.
- Never short-circuit a solar panel.
- Avoid exposed electrical conductors.
- Use suitable cable sizes.
- Keep electrical equipment protected from rain.
- Ensure adult supervision during construction.
Battery Safety
Battery technology matters. Lead-acid batteries require appropriate ventilation and handling, while lithium batteries require compatible charging and protection systems.
Never use damaged, swollen or leaking batteries.
Inverter Safety
An inverter can produce dangerous AC voltage. AC wiring and connections should be handled by qualified personnel, not unsupervised learners.
Technical Limitations
- Solar generation varies with sunlight.
- Panel temperature affects performance.
- Shading can significantly reduce output.
- Batteries increase the total system cost.
- Incorrect component sizing can damage equipment.
- Actual energy production is lower than ideal rated calculations because of system losses.
15. Future Improvements and Research Opportunities
Schools can develop more advanced innovations from the basic solar demonstration model.
| Innovation | Technology | Potential benefit |
|---|---|---|
| Automatic solar tracker | Arduino and LDR sensors | Adjusts panel orientation |
| Smart battery monitor | ESP32 and voltage sensors | Monitors battery condition |
| Solar irrigation controller | Moisture sensors | Improves water management |
| Solar weather station | Environmental sensors | Records weather conditions |
| Solar energy dashboard | ESP32 and Wi-Fi | Displays energy production |
| Solar-powered greenhouse | Sensors and automation | Supports controlled agriculture |
These projects provide opportunities to integrate physics, chemistry, agriculture, mathematics and computer technology.
16. Frequently Asked Questions (FAQs)
1. How much does a 100W solar panel cost in Kenya in 2026?
A 100W solar panel may cost approximately KES 3,500–6,500, depending on the seller, manufacturer, technology and warranty. Confirm the rated output and product condition before purchasing.
2. Which solar panel size is best for school projects?
A 100W or 200W solar panel is a practical starting point for most small school demonstrations. Larger panels are suitable for advanced prototypes that require more electrical power.
3. Can a solar panel power an Arduino or ESP32?
Yes. A solar panel can power an Arduino or ESP32 through a properly designed power system incorporating suitable regulation, battery storage where necessary and voltage protection.
4. Can a 200W solar panel charge a 12V battery?
Yes, provided the solar charge controller is correctly sized and compatible with the panel and battery. Charging current, battery chemistry, voltage limits and charging settings must all be considered.
5. Where can I buy solar panels in Nairobi?
You can compare solar equipment from electronics retailers along Luthuli Avenue and specialist solar equipment suppliers. Online marketplaces such as Jumia Kenya also offer solar products.
6. How long does a solar panel last?
Solar panels commonly have an expected service life of approximately 25 years or longer, depending on product quality and environmental conditions. Performance gradually declines over time, and the manufacturer’s warranty should be checked.
17. Conclusion: Choosing the Best Solar Panel for Your School Project
Solar energy is an excellent learning opportunity for Kenyan schools and STEM innovators. It allows learners to understand electricity generation, energy storage, environmental sustainability and practical engineering.
The solar panel price in Kenya in 2026 varies according to capacity, technology, brand and supplier. A 100W panel may be sufficient for a basic classroom demonstration, while 200W–300W panels offer greater flexibility for school prototypes. Larger 400W–550W panels can support more demanding projects.
For teachers and KSEF project advisors, the best approach is to select a panel according to the actual electrical requirements, develop a functional prototype, collect experimental data and demonstrate how the innovation addresses a real problem.
Remember: A successful school solar project is measured by its scientific value, originality, functionality and practical application—not simply by the wattage or price of its solar panel.