Floral Star Decorations from Repurposed Paper Rolls
Abstract:
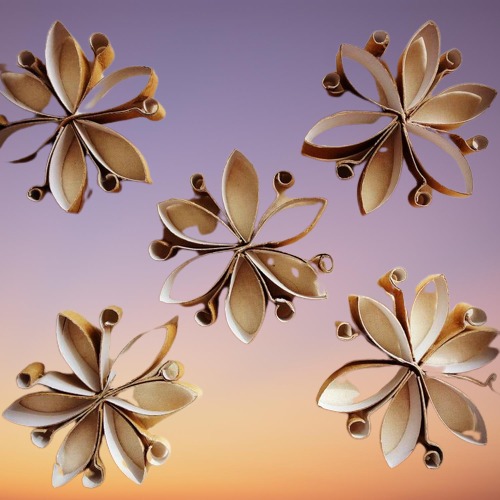
This project is an eco-friendly DIY craft that transforms ordinary cardboard paper rolls into elegant floral or star-shaped decorations. These can serve as wall art, holiday ornaments, or elements in larger decorative installations. Using simple materials and tools, this project is approachable and customizable, suitable for all ages.
Materials:
- Empty Cardboard Paper Rolls:
Use cardboard rolls from toilet paper or paper towels. The number of rolls you need will depend on the number of decorations and their size. Each roll generally yields about 8-10 petals. - Scissors:
A good pair of sharp scissors is essential for clean cuts. Dull scissors can cause uneven edges. - Glue:
Use a hot glue gun for quicker drying times and stronger adhesion, or regular craft glue if you’re working with children. - Clips or Clothespins:
These are useful for holding the petals together while the glue dries, ensuring a secure bond. - Paint (Optional):
Acrylic or spray paint works well to add color. Metallic or pastel colors can give a professional and polished look. - Paintbrush (Optional):
If using acrylic paint, a small paintbrush will be needed for even application. - Additional Decorative Elements (Optional):
Thin strips of paper, beads, or glitter can add extra detail and texture to the decorations.
Procedure:
Step 1: Prepare the Paper Rolls
- Flatten the Rolls:
Gently press down on each cardboard roll to flatten it. This will make it easier to cut even strips, and the resulting strips will be petal-shaped. - Cut the Rolls into Strips:
Using scissors, cut the flattened roll into equal-width rings, each about 1-1.5 cm wide. These rings will serve as the petals of your flower/star shape. Aim for consistent width for a more professional finish.
Step 2: Shape the Petals
- Form the Petals:
Take each cut ring and press the edges to form an oval or “petal” shape. This shape will help create a floral or star look when assembled. - Create Extra Shapes (Optional):
For added decoration, you can take additional strips, curl them, or shape them into spirals or loops to add accents later.
Step 3: Assemble the Design
- Plan Your Design Layout:
Place the petals in your desired arrangement on a flat surface. Typically, a simple flower shape is made by arranging 5-6 petals in a circular pattern, with each petal’s tip meeting in the center. You can also experiment with shapes and numbers to create unique designs. - Glue the Petals Together:
- Apply a small dot of glue at the points where each petal will connect. Press the glued sections together and hold them in place for a few seconds to secure.
- Use clips or clothespins to hold the petals together while the glue dries, especially if you’re using craft glue (which takes longer to dry than hot glue).
- Add Decorative Elements (Optional):
- After the main structure is dry, glue additional elements like curled paper strips, small spirals, or beads between or at the center of the petals for extra flair.
Step 4: Painting and Decoration (Optional)
- Painting:
- Once the structure is fully dry, you can paint your decoration. Spray paint provides an even coat and is faster, but acrylic paint with a brush works well too.
- Apply paint evenly to cover all sides of the decoration. Metallic colors like gold or silver can give a festive touch, while pastels create a softer look.
- Adding Finishing Touches:
- After the paint is dry, you may add embellishments like glitter, or use a fine brush to add details with contrasting colors.
Step 5: Drying and Final Assembly
- Allow Full Drying Time:
- Make sure all elements are completely dry before handling the decoration.
- Finishing Options:
- These decorations can be hung directly on the wall, placed on a tabletop, or used as ornaments for various occasions. You can also attach a string or ribbon if you’d like to hang them.
Results:
The final result is a beautiful, handmade decoration that resembles a flower or star. The cardboard rings, once painted, can look surprisingly elegant, especially when grouped together or arranged into larger patterns. The versatility of this project allows for a wide range of customization in terms of color, size, and additional decorative elements, making each piece unique.


