Introduction
Creating your own home decor can be an incredibly rewarding experience, especially when it involves crafting beautiful items from basic materials. A DIY paper flower vase with handmade flowers can be a wonderful addition to your space, providing a colorful and personalized touch. Whether you want to decorate your room, give a handmade gift, or create a classroom project, this easy-to-follow tutorial is perfect for beginners and seasoned crafters alike. In this guide, we’ll go over everything you need, the step-by-step process, and the final results of making a stunning paper flower vase.
Abstract
This DIY project tutorial provides a detailed method to make a paper flower vase from scratch. You’ll be able to create a beautiful, handcrafted vase using only paper, glue, scissors, and a few decorative items. This project is simple yet effective, and it’s an excellent way to enhance your crafting skills. By the end of the guide, you’ll have a unique vase filled with colorful paper flowers that can brighten any room or serve as a thoughtful handmade gift.
Materials
Before you begin, gather the necessary materials. Each item plays a crucial role in building the structure and aesthetics of your paper flower vase.
- Green and Yellow Colored Paper: Green paper will be used to create the vase itself, as well as the flower stems and leaves. Yellow (or any preferred color) paper is used for the flowers.
- Pink or Red Paper: To add variety to your arrangement, you can use pink or red paper to create additional flowers or accents.
- Scissors: For cutting out the shapes of the vase, flowers, stems, and leaves.
- Glue or Double-Sided Tape: For assembling the vase and attaching the flowers and leaves securely.
- Ruler and Pencil: To mark measurements for precise cuts, ensuring symmetry in your shapes.
- Decorative Beads or Pearls (optional): Small beads or pearls can be used as the center of each flower, adding a touch of elegance to your paper vase.
- Crafting Mat (optional): If you are working on a delicate surface, a crafting mat can help protect it while you cut and assemble your pieces.
Procedure
Step 1: Prepare the Vase Base
- Start by cutting a rectangular piece of green paper (approximately 8 inches by 10 inches, depending on the desired vase size).
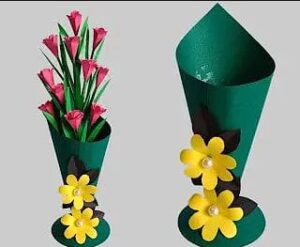
- Roll the paper into a cone shape, which will serve as the body of the vase. Adjust the tightness of the cone to make it tall and narrow or wide and short, depending on your preference.
- Once you have the desired shape, secure the edge of the cone with glue or double-sided tape. Hold it in place until it’s dry and stable.
- For added stability, cut a circle from green paper to create the base of the vase. The diameter of the circle should match the bottom of your cone. Attach the circle to the bottom of the cone with glue and press gently to ensure it’s secure.
Step 2: Create the Flowers
- Using yellow paper (or any color you prefer for the flowers), cut out flower shapes. You can make simple five-petal designs, or try different styles like roses or tulips by folding the paper into layers.
- To add dimension, lightly fold and crease each petal. This gives the flowers a more realistic appearance.
- Optional: If you have decorative beads or pearls, glue one in the center of each flower. This adds elegance and enhances the look of the final product.
Step 3: Add Leaves and Stems
- Cut thin strips from the green paper for the stems. The length of each strip can vary, creating a natural look.
- For the leaves, cut small, oval shapes from the same green paper. You can add details by folding each leaf in half lengthwise and making small creases to resemble veins.
- Attach each leaf to a stem by applying a small dot of glue at the bottom of the leaf. Press gently and hold until it’s secure.
- Once you’ve prepared all the stems and leaves, attach each flower to the top of a stem, applying a small amount of glue at the base of the flower.
Step 4: Assemble the Vase Arrangement
- Place the stems with flowers inside the vase. You may need to apply glue to the bottom of the stems if they aren’t standing upright on their own.
- Arrange the flowers at different heights to create a balanced and natural look. Ensure that each flower is visible from the front of the vase.
- Attach additional flowers and leaves to the outer part of the vase, creating a layered effect that enhances the visual appeal.
- For an added touch, glue a few leaves around the base of the vase. This adds fullness to the design and makes the vase look more complete.
Results
Upon completing these steps, you will have a vibrant, handmade paper flower vase that adds beauty to any setting. The green cone-shaped vase provides a sturdy base for the colorful flowers, and the combination of yellow, pink, and green creates a harmonious and eye-catching look. With its delicate flowers and decorative touches, this paper vase makes a wonderful centerpiece for tables, desks, or shelves.
This DIY flower vase is perfect for various occasions, whether it’s a Mother’s Day gift, a classroom craft project, or a creative home decor item. The handmade quality gives it a unique charm, and the materials are budget-friendly, making it accessible for all skill levels.
Conclusion
Crafting a paper flower vase is a delightful project that brings out creativity while allowing you to make something beautiful with your hands. This guide has shown how simple materials like colored paper, scissors, and glue can be transformed into a decorative item that you’ll be proud to display. Each step allows for customization, giving you the freedom to experiment with colors, shapes, and arrangements.
The final product is a stunning flower vase that embodies the elegance and beauty of handmade crafts. Not only does it serve as a lovely decor piece, but it also showcases your artistic abilities and patience. Enjoy the process, and don’t hesitate to personalize your paper flower vase to make it truly unique. Whether displayed in your home or given as a gift, this DIY paper vase will bring smiles and admiration from everyone who sees it.


